Go beyond the basics with Google Analytics
READER NOTE: The following guide is not applicable for Google Analytics 4 (GA4).
You may find the guide informative if you are still using Universal Analytics.
Defining “the basics”
The basic Google Analytics skillset for Digital Marketers often includes the following:
- Confidently navigating to the Channels, Source/Medium, and Referrals tabs to view a breakdown of traffic by source (social, paid search, organic search, etc.)
- Tagging links and emails with UTM params for tracking.
- Tracking Ecommerce conversion rate and sales/revenue numbers.
- Watching for changes in metrics like Bounce Rate or Average Time on Page to diagnose the impact that website changes have on conversions.
- Keeping track of major site/store changes with annotations
- Turning on Google Analytics Ecommerce for a platform like Shopify or BigCommerce.
In this guide, I’ll lay out some intermediate-level GA tips and tricks to help Marketers move beyond this list of the basics, level up their personal GA skillset, and shore up their brand’s analytics data.
Intermediate-level Google Analytics knowledge for Digital Marketers
What you’ll take away from this guide
The end result of this guide will be a new “Clean Data” Google Analytics view for your web property (Ecommerce store, landing page, blog, etc.).
This “Clean Data” view will include custom filters, exclusion lists, and configuration options that will make the day-to-day experience of using Google Analytics more pleasant for you and your team.
In this guide:
- Working with multiple Google Analytics reporting views
- Show full URLs for page view data
- Show full URLs for your referrer traffic
- Adding filters to standardize case of all UTM parameters
- Add a filter to prevent GA code hijacking
- Creating and maintaining a Query parameter exclusion list
- Configure a Referral Exclusion list
- Verify Google Search Console <> GA linking
- Using secondary dimensions and advanced filtering to mash up data
- An additional resource for those using Shopify or Shopify Plus
1. Working with multiple Google Analytics reporting views
Before we dive into making any changes to our brand’s Google Analytics account, let’s make sure we have a place to “sandbox” our work.
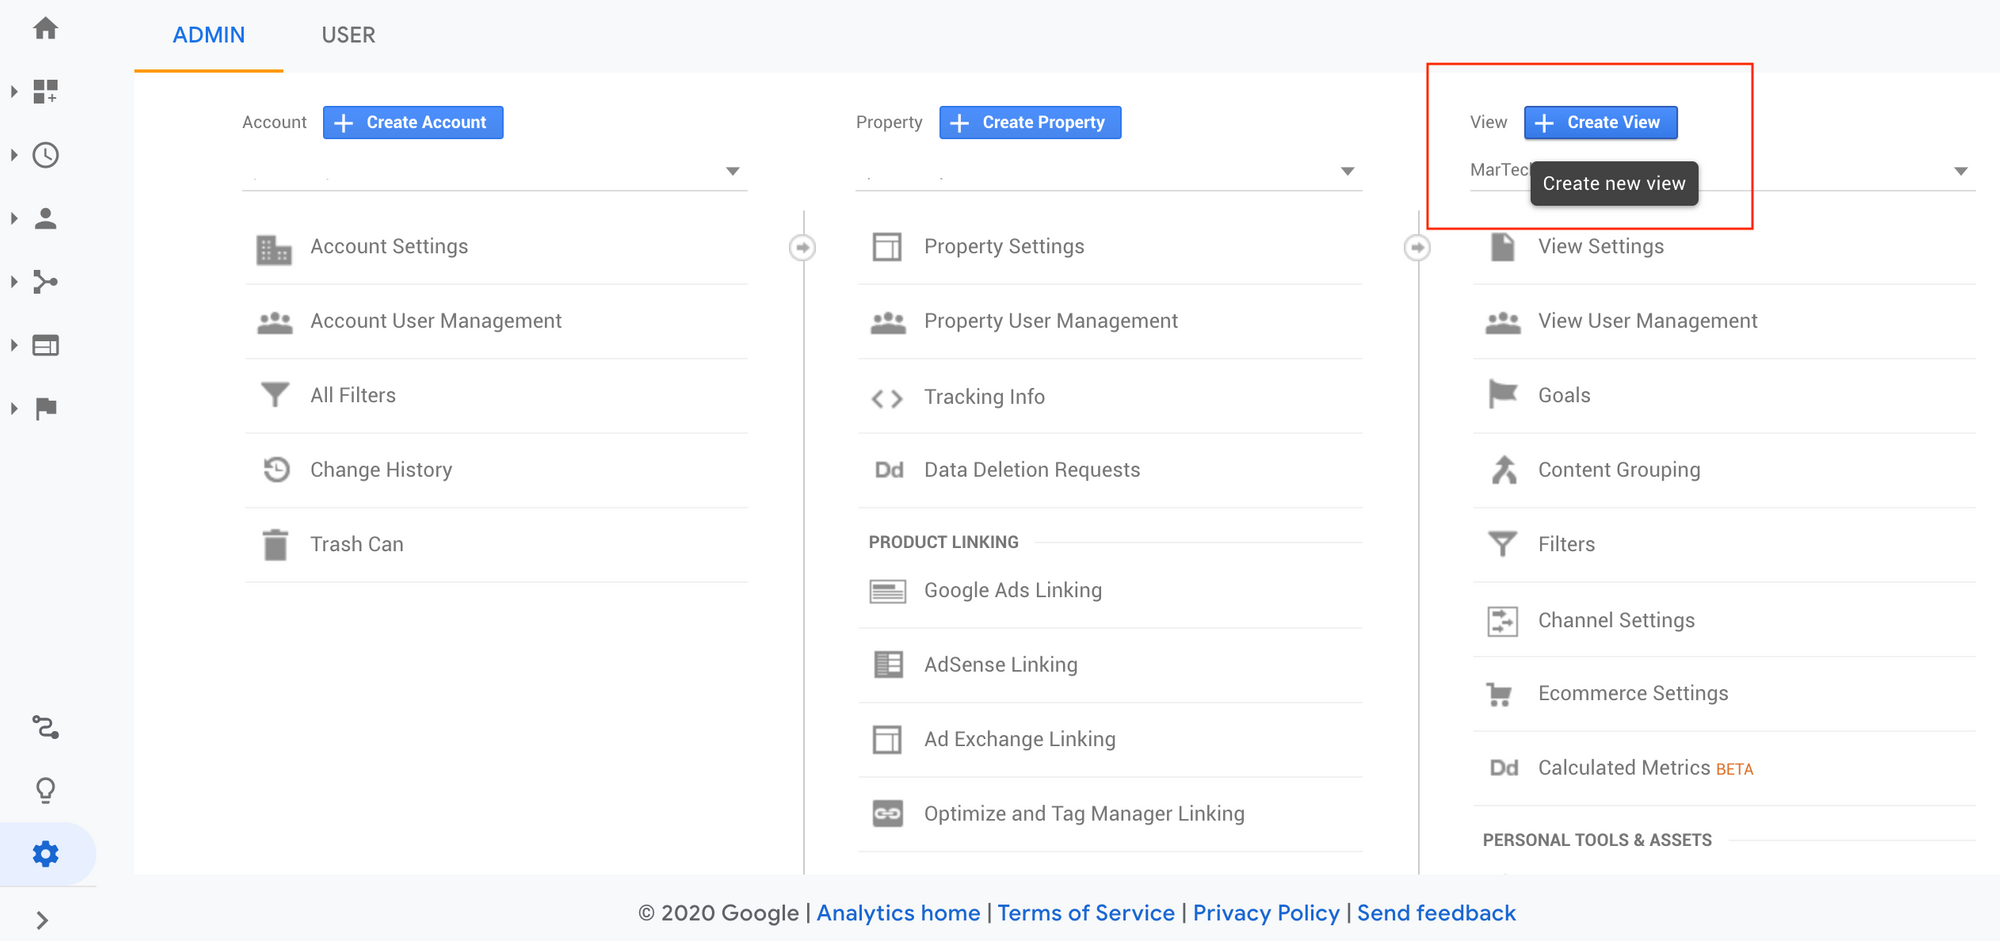
We’ll do this by creating a new Google Analytics “ Reporting View” that will contain the majority of our changes.
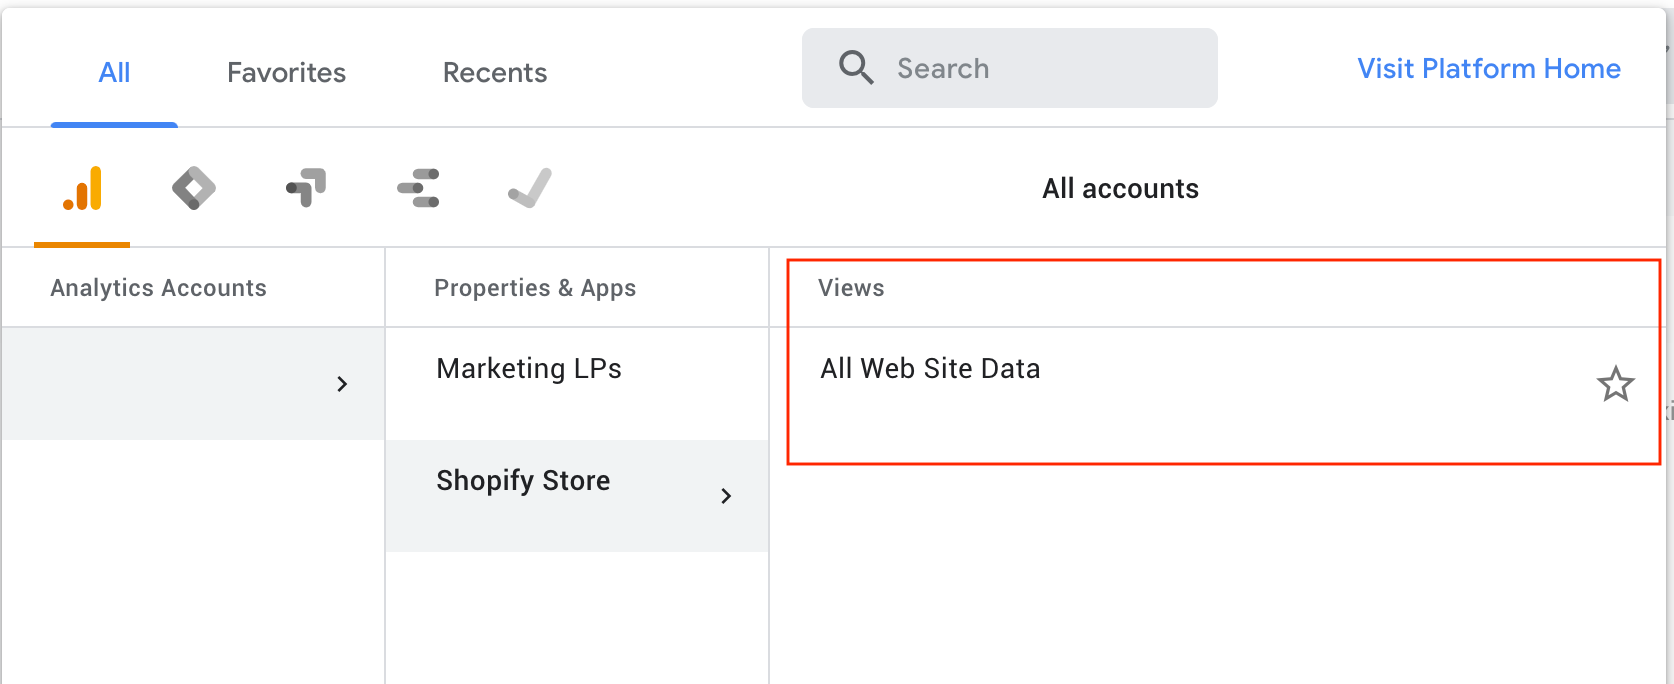
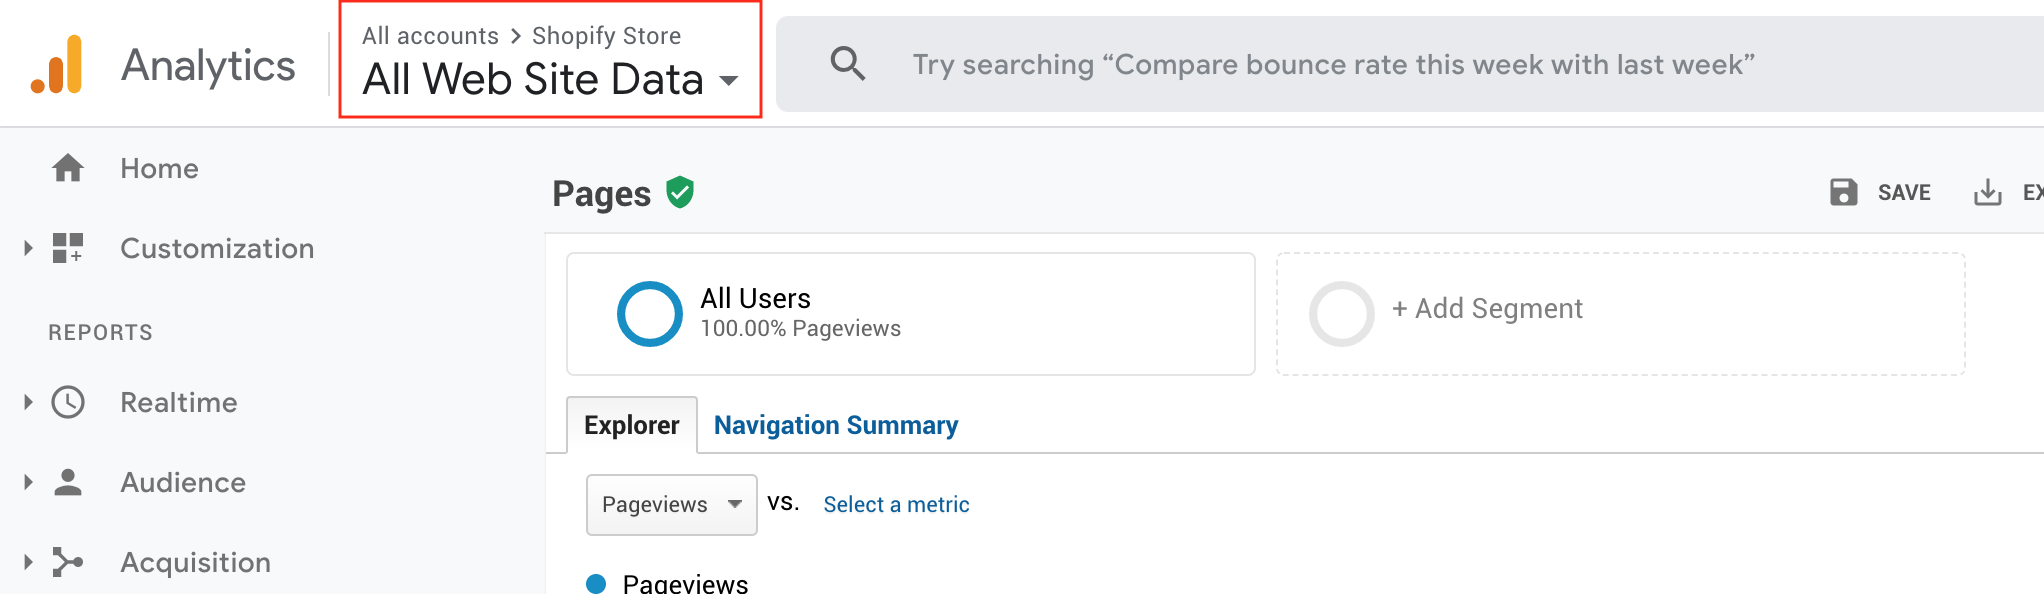
You may already be familiar with GA reporting views without knowing them by name. When a new tracking ID is created (the kind you might generate when setting up GA tracking for new website or blog), a default view is generated – that’s the “All Web Site Data” phrase that you are likely to see in the top left of your GA admin panel.
I’ve intentionally started the guide with the task to add a new view or two to your GA property, as it will be your insurance policy as we make changes + updates to your team’s GA account.
Keep in mind that data sent to new GA views is not retroactive and will not backfill with historical data. This means that the improvements and filters that we add in this guide will apply only to the page view + event data collected going forward.
When I begin working with a new brand, I like to ensure that they have some variation of the following three views created and configured.
- The default GA view (i.e. All Web Site Data)
- A raw and completely unfiltered view (i.e. Raw Data)
- A Marketing “Clean Data” view (e.g. MarTech Clean Data or just Clean Data)
Keeping the Raw Data view free of filters + customizations allows it to serve as a fresh start and an insurance policy in case any partners or colleagues make a change that disturbs data in the All Web Site Data view.
Here’s a look at what you should see after adding new views for Raw Data and Clean Data –
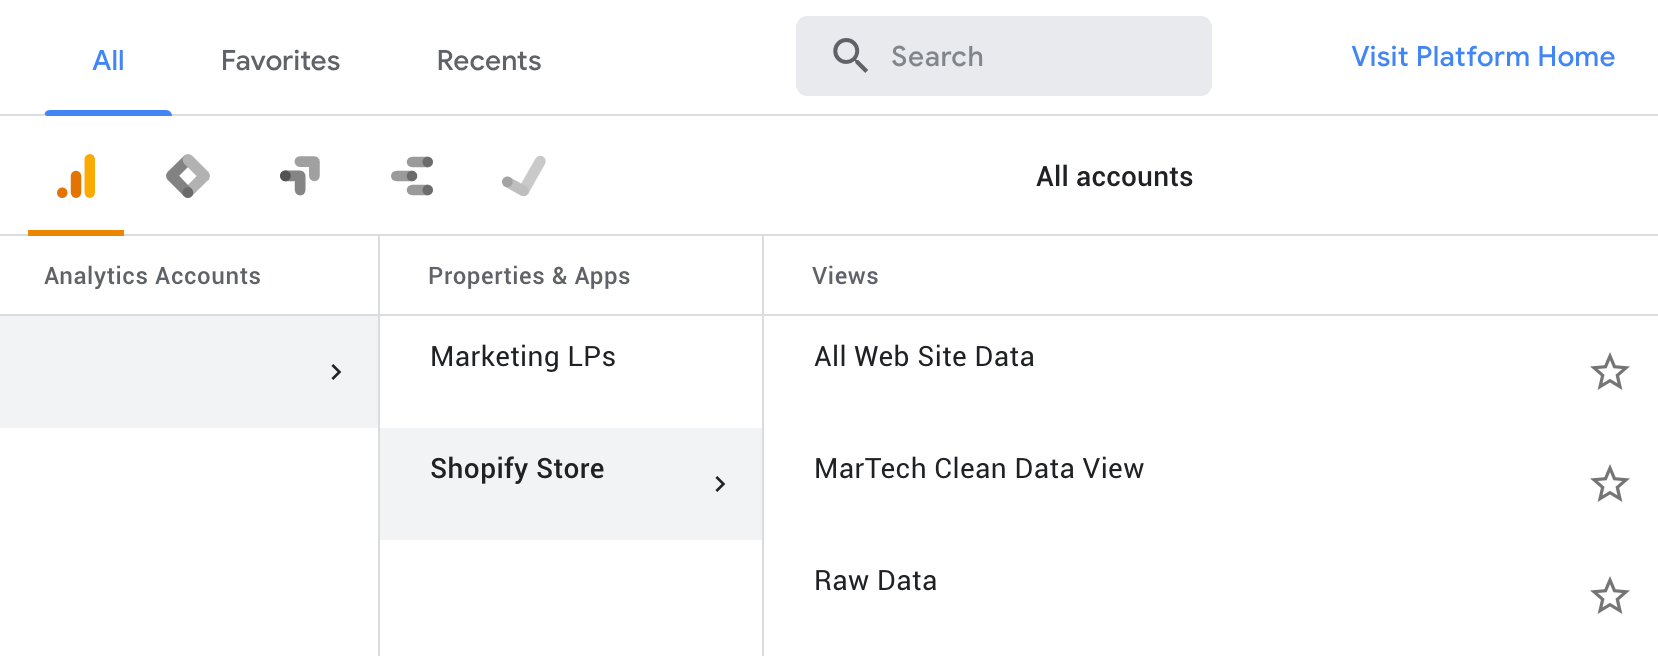
Ideally these views are added and configured at the same time a new GA Property is generated (again - data is not backfilled when a new view is added), but the reality is that most teams will add them much later on – totally ok!
Note: If your team is using Google Analytics Ecommerce, be sure to enable the GA Ecommerce Tracking toggle on each new view you create before moving on.
Similarly, if your team has their Google Analytics account linked to their Google Ads account, be sure to re-link GA <> Google Ads for each new view.
2. Show full URLs for page view data
Now that we’ve got a fresh Clean Data view to work in, let’s add a view filter to transform the URL displayed in the Behavior -> Site Content -> All Pages view from only the URL path (i.e. /about-us) into the full URL (i.e. yoursite.com/about-us).
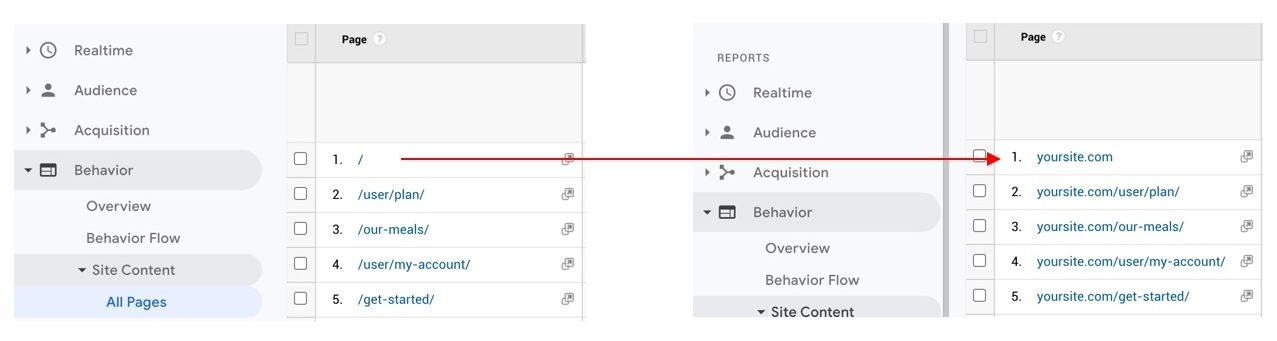
This change is especially helpful if your team is using the same GA Tracking ID (i.e. UA-12345678-1) in multiple locations (e.g. your main website, your blog, Zendesk support site, pageviews sent by various marketing tools, etc.)
Without the addition of this URL view filter, all of the following traffic would be showing up under the / page in the All Pages listing:
- Your main website’s homepage (i.e. yoursite.com)
- Your blog’s homepage (i.e. blog.yoursite.com)
- Your Zendesk support site homepage (i.e. support.yoursite.com)
- Views of your email pop-up marketing tool (e.g. BounceX, WisePops, or Privy)
To add this URL filter on all page view events that your GA tracking code sends to your Clean Data reporting view, head to the GA admin panel and navigate to the Filters tab_._
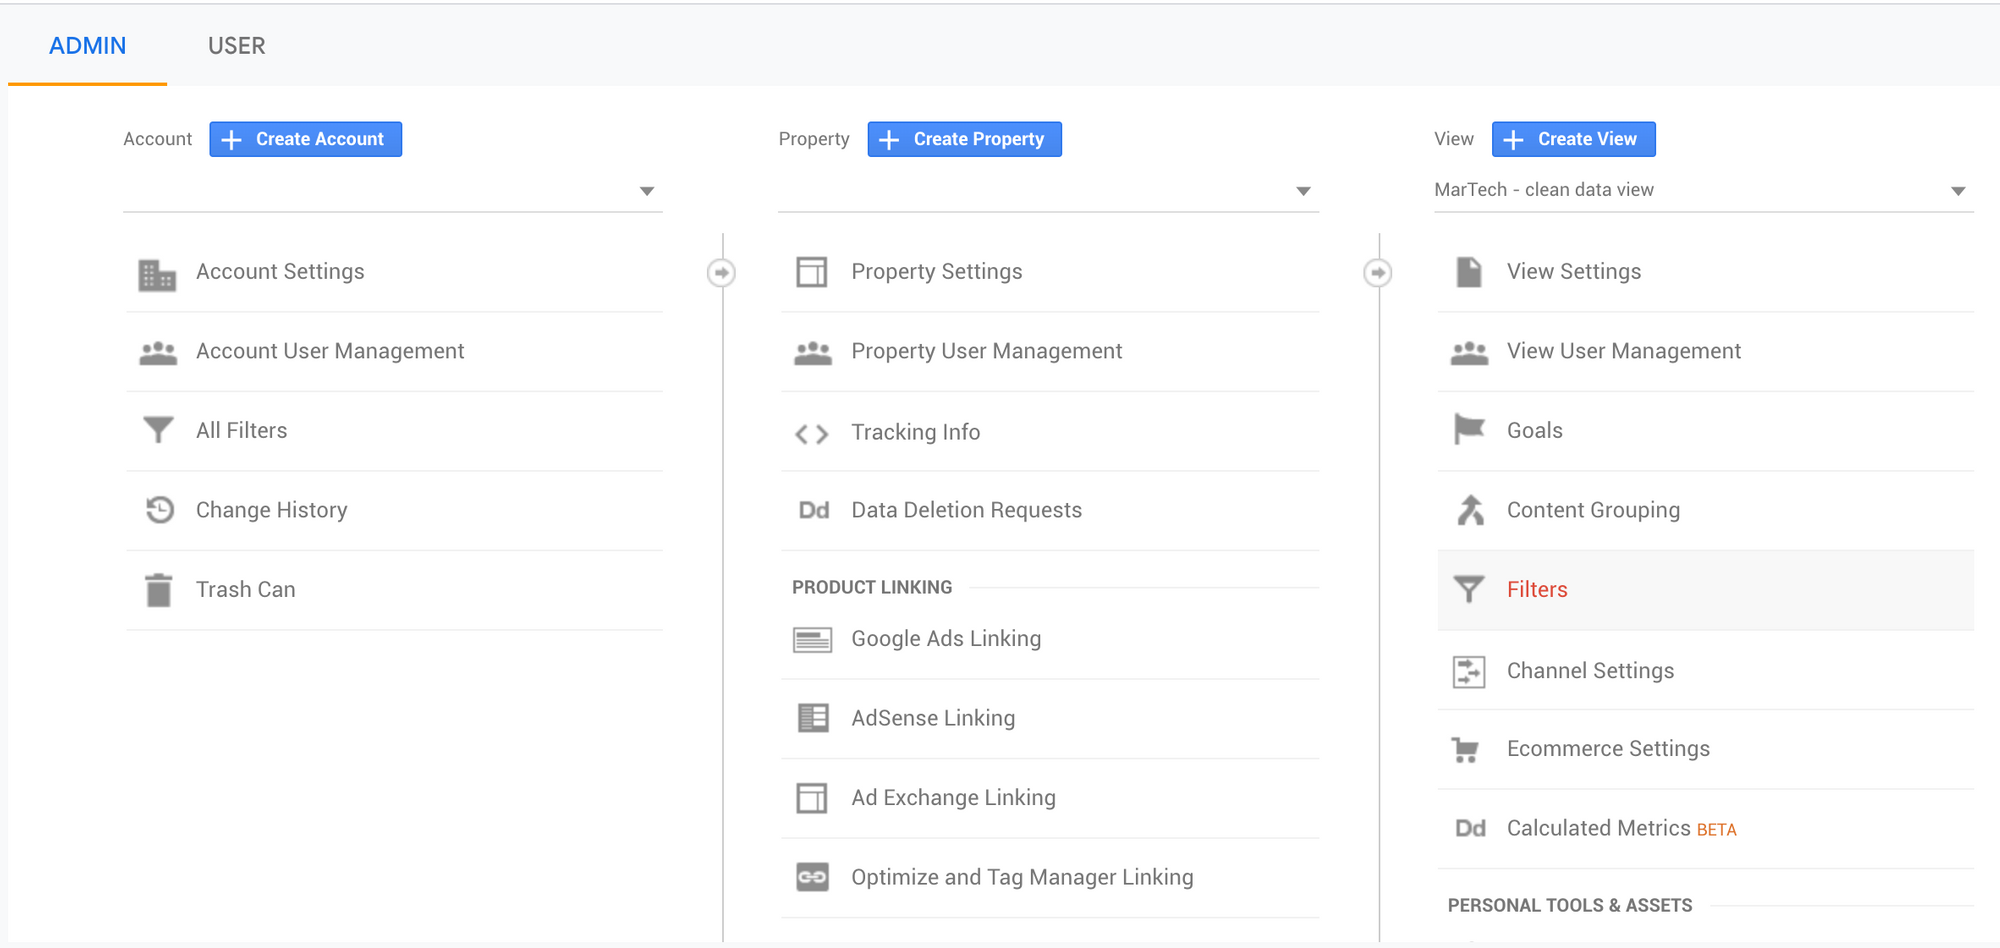
From the Filters menu, click on “Add Filter” and create an Advanced Filter with the following settings:
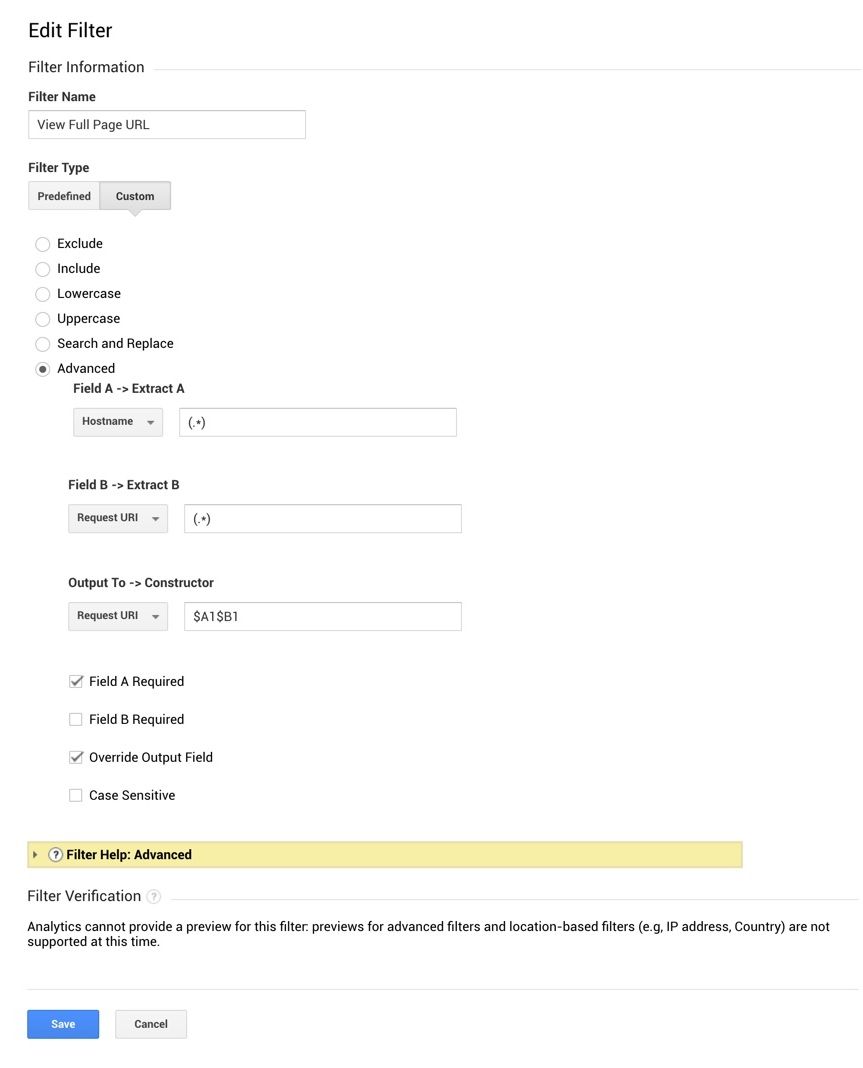
- Filter Name: View Full Page URL
- Filter Type: Custom -> Advanced
- Field A -> Extract A: Select Hostname from the dropdown list and enter
(.*) - Field B -> Extract B: Select Request URI from the dropdown list and enter
(.*) - Output To -> Constructor: Select Request URI from the dropdown list and enter
$A1$B1 - Checkboxes: Select Field A Required and Override Output Field
Here’s what the completed filter should look like once completed:
3. Show full page URLs for your referrer traffic
Here’s a great one that I learned from a post written by Stuart McKeown at Gleam.io.
If you’ve ever been frustrated by the fact that GA does not show the full URL path for referring page data (aka seeing only mashable.com instead of mashable.com/articles/post-about-your-brand ), you can add the following filter to enhance your referrer URL data going forward.
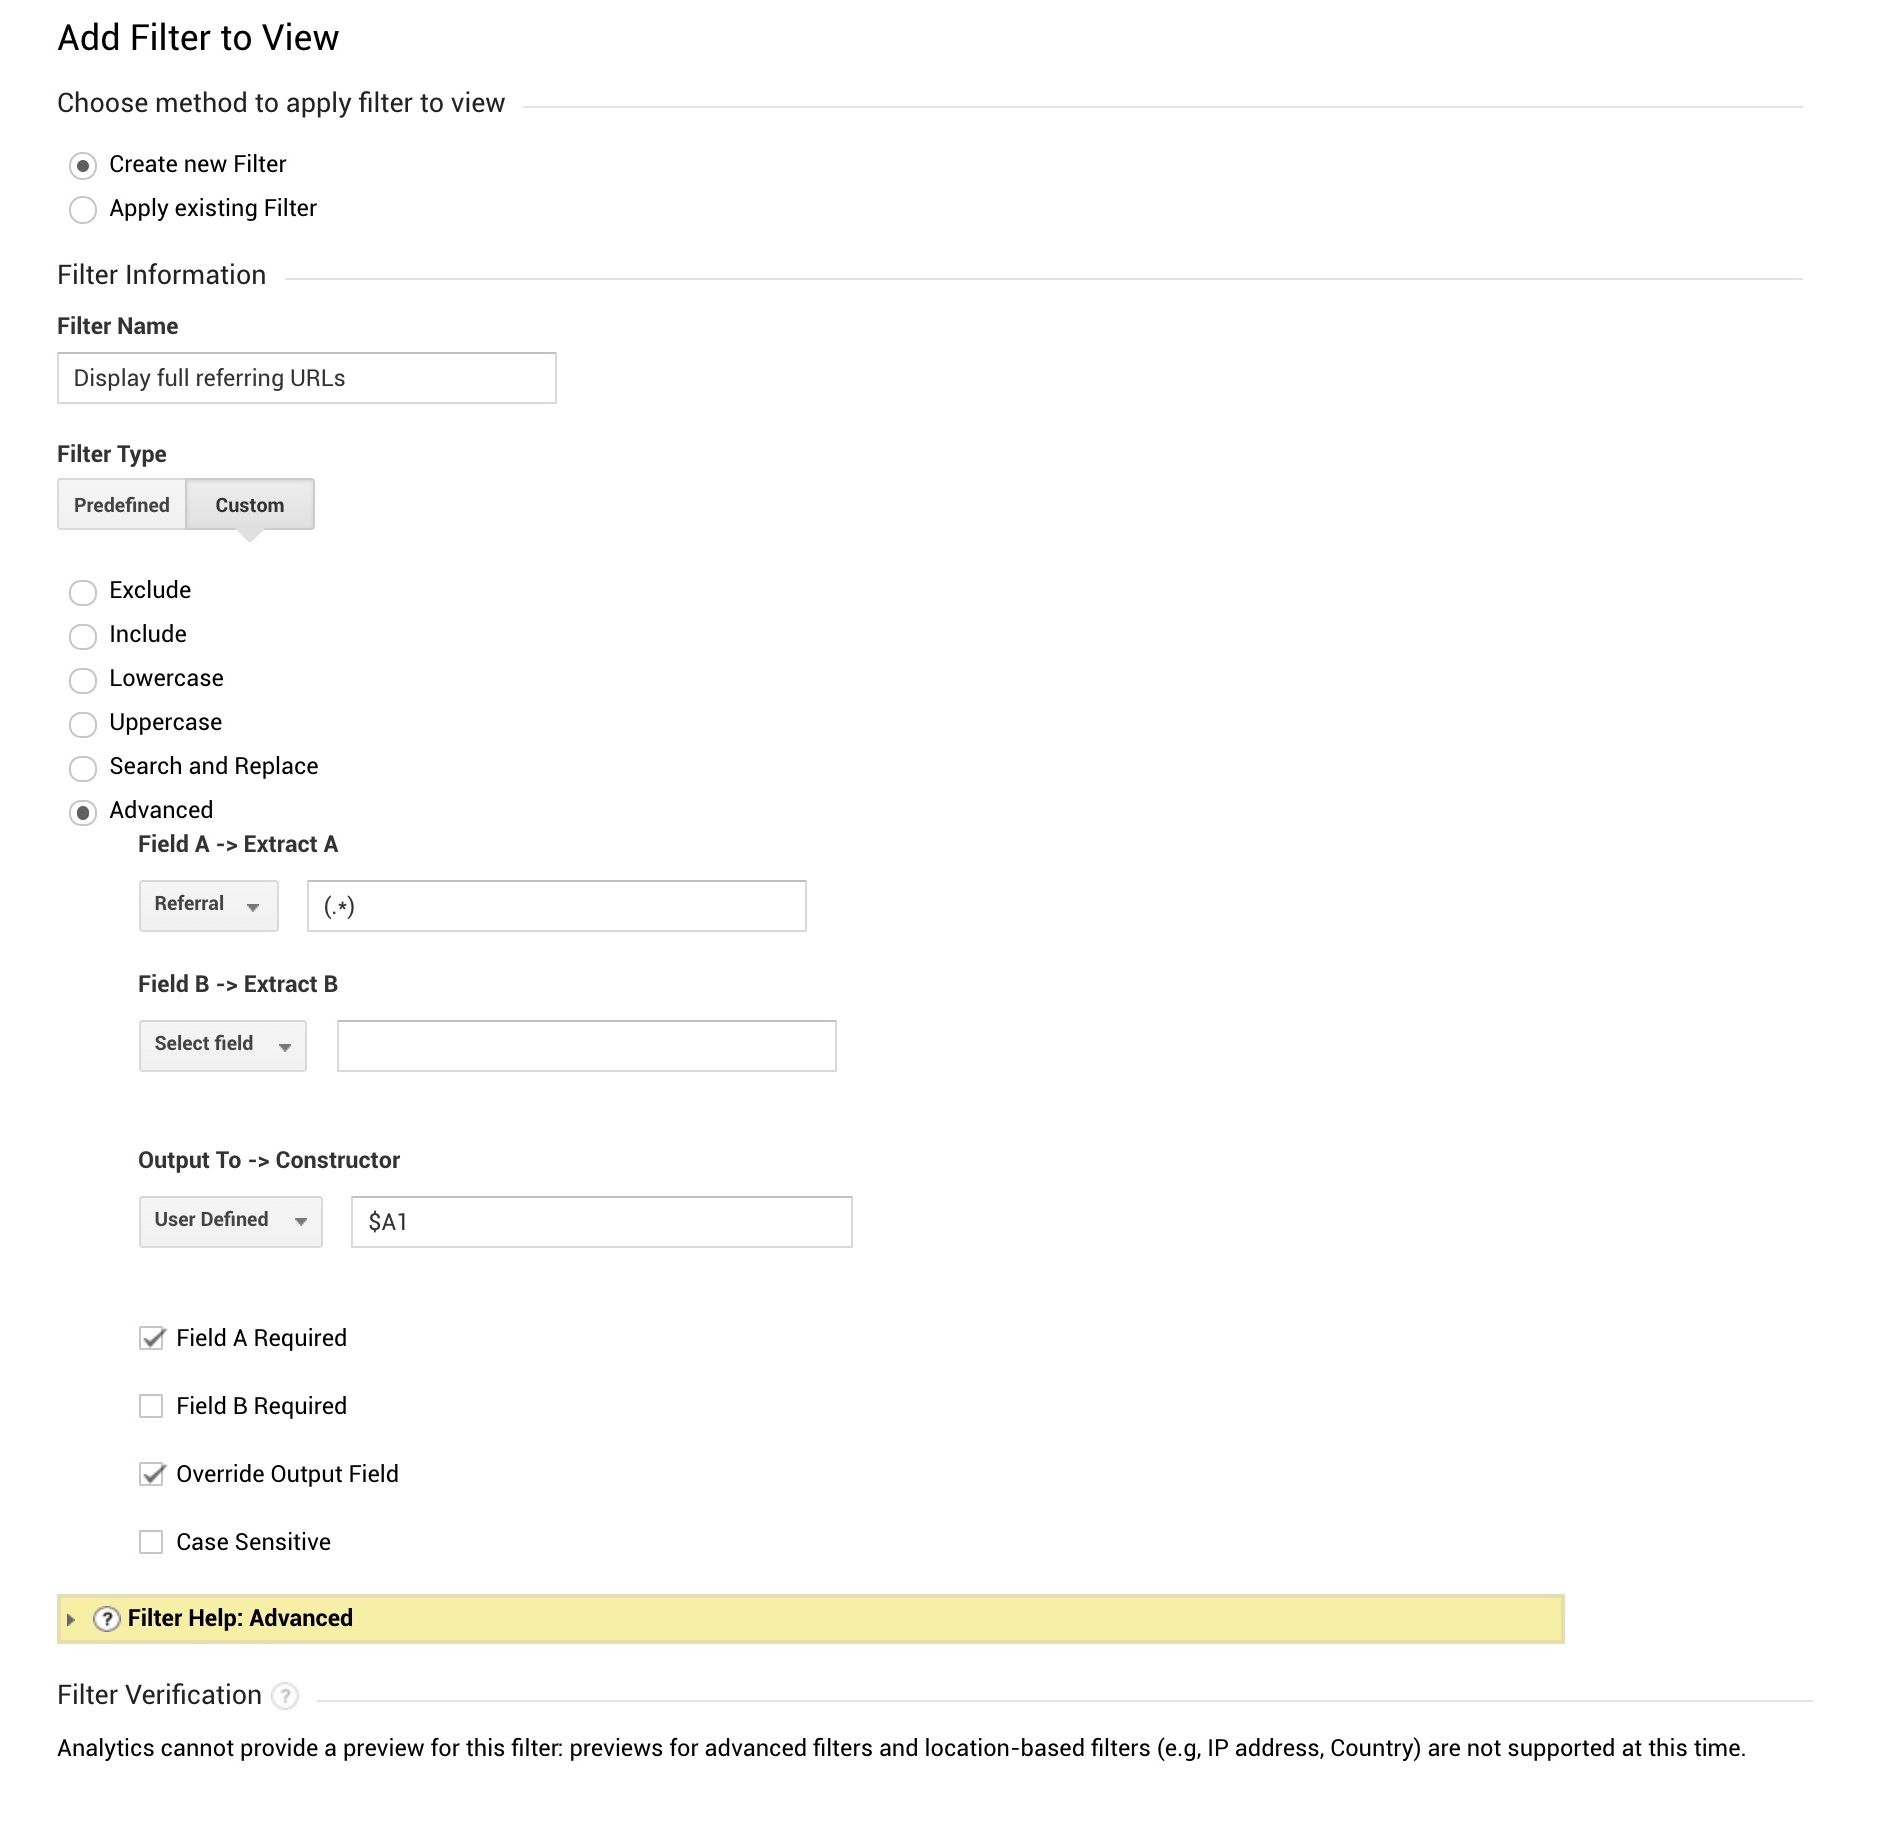
GA filter to show full referrer URL
- Filter Name: Display full referring URLs
- Filter Type: Custom -> Advanced
- Field A -> Extract A: select “Referral” from the dropdown and enter
(.*) - Field B -> Extract B: leave this blank
- Output To -> Constructor: select “User Defined” from the dropdown and enter
$A1 - Check the following boxes:“Field A Required” and “Override Output Field”
Here’s what the completed filter will look like:
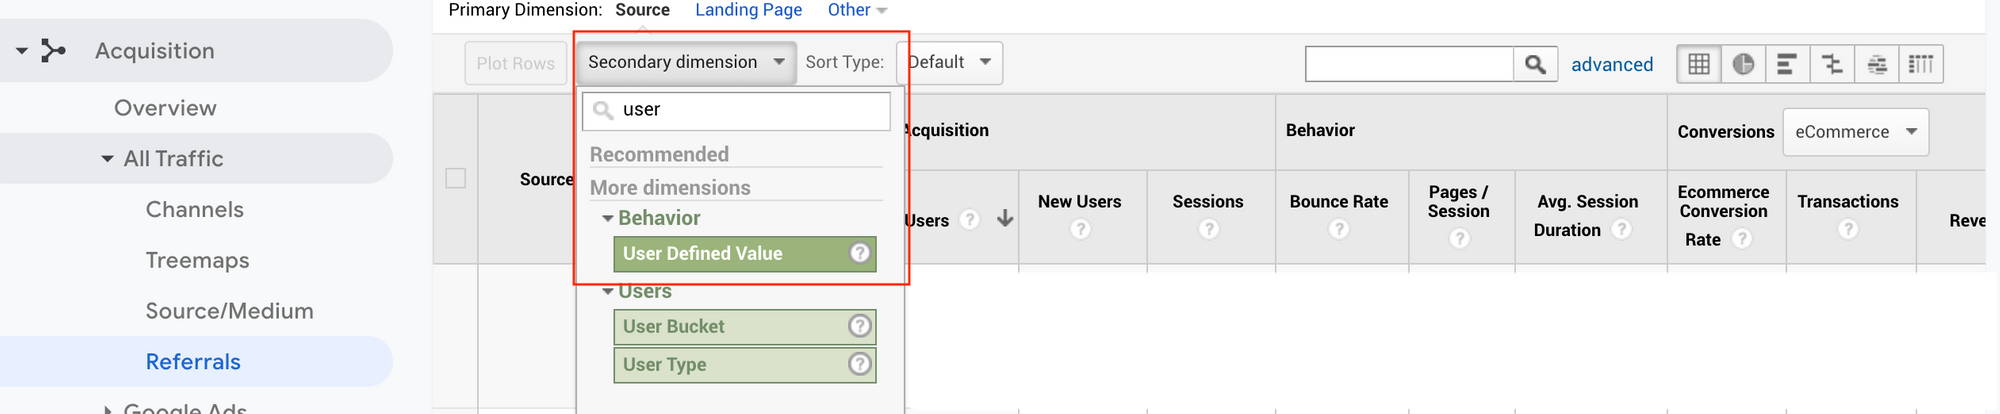
Now you can go to any report and add the “User Defined” Secondary Dimension to see the full referring URL for applicable traffic. Some useful reports where you might wish to view the full referring URL:
- See which article a specific purchase came from (Conversions -> Ecommerce -> Sales Performance)
- See which organic social content is driving traffic to top landing pages (Acquisition -> Social -> Landing Pages)
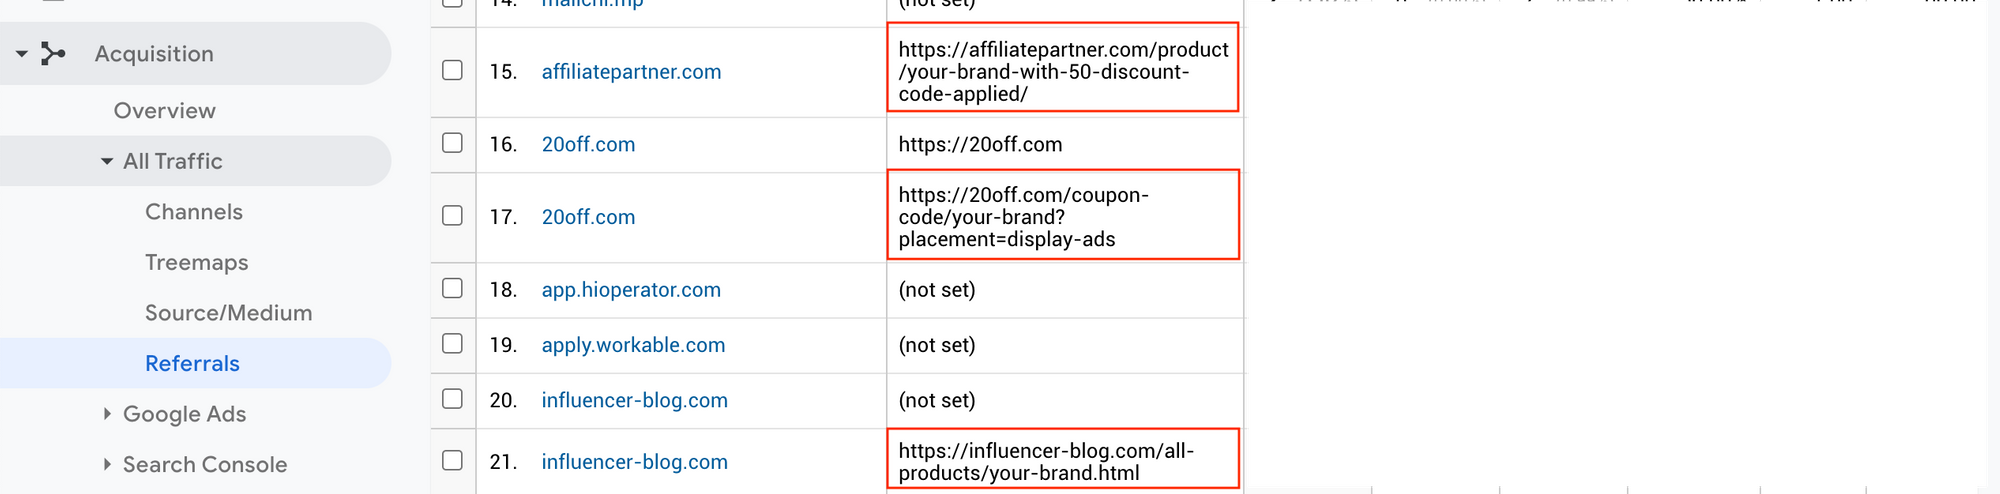
Below is a look at what we can expect to see in the Acquisition -> All Traffic -> Referrals report after making this change.
You can filter down to only rows that have something other then “(not set)” by using the following regex on a Secondary Dimension filter of User Defined Value: [^(not set)]
4. Adding filters to standardize case of all UTM parameters
While we’re still in view filter creation mode, let’s tackle another common issue - inconsistent UTM parameter case data.
This issue manifest as an alert in the Google Analytics dashboard titled, “Duplicate Campaign Parameters.”
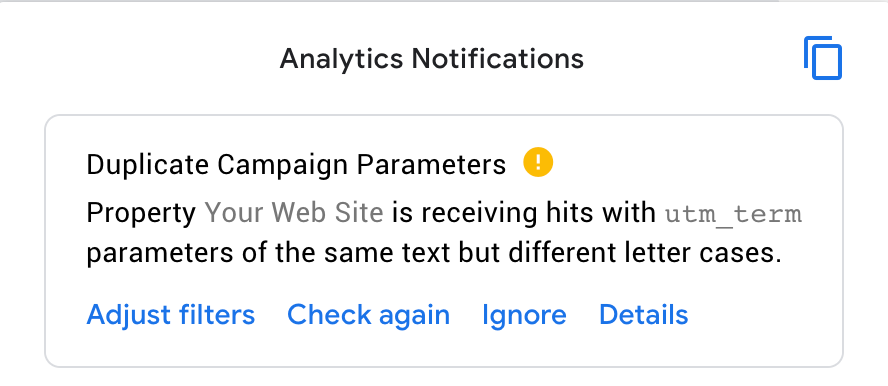
Why do we often see these errors? Google Analytics treats UTM parameter values as case-sensitive values.
As brands start working with external Marketing partners and agencies, it becomes almost impossible to maintain case consistency across everyone who is adding UTM params to links on a daily basis.
Example of the “Duplicate Campaign Parameters” issue:
When a page view hit comes in for traffic tagged with yoursite.com?utm_source=Newsletter&utm_campaign=July4thPromo (where “Newsletter” is capitalized”), GA records that UTM Source value separately from a page view hit for yoursite.com?utm_source=newsletter&utm_campaign=july4thpromo (where “newsletter” is lowercased).
The previous example would appear in Google Analytics Acquisition -> All Traffic -> Source/Medium tab grouped as separate campaigns.
- Newsletter / July4thPromo - 1 visit
- newsletter / july4thpromo - 1 visit
The ideal case would be for visits to be grouped together into a single Source/Medium line item:
- newsletter / july4thpromo - 2 visits
While it’s possible to create internal guidelines and request that everyone on the team always uses the same case format when tagging links with UTM parameters, adding lowercase standardization filters in GA will save you the hassle of corralling co-workers and external partners to follow the guidelines in the future.
Adding lowercase filters to standardize UTM values in Google Analytics
The process for adding lowercase filters is very similar to how we added View Full Page URL in the previous step. First, head to the GA admin panel and click to add a new filter in your Clean Data reporting view.
We’ll be creating lowercase filters for the following cases, covering all standard UTM parameters and search terms:
- Campaign Name
- Campaign Source
- Campaign Medium
- Campaign Term
- Campaign Content
- Search Term
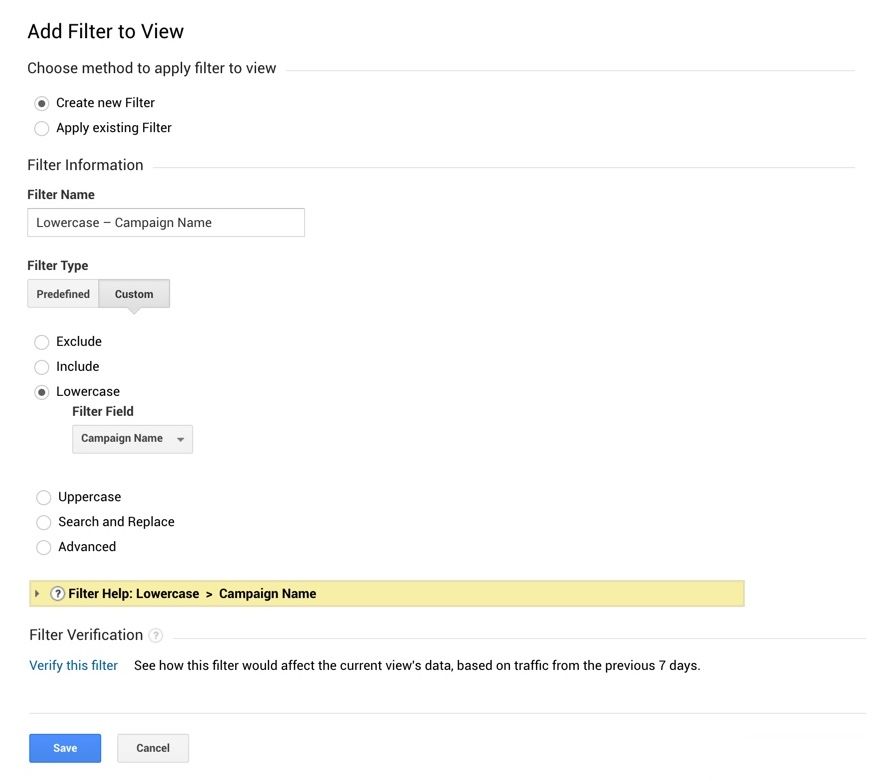
For each of the cases above, add a filter following the format below. Here’s what to configure for each filter, using Campaign Name as our example:
- Filter Name: Lowercase - Campaign Name
- Filter Type: Custom -> Lowercase
- Filter Field: Select the appropriate UTM value from the dropdown, i.e., Campaign Name
5. Add a filter to prevent GA code hijacking
Here’s another filter that I first discovered from Stuart McKeown at Gleam.io. Let’s go over the context and reasoning behind adding this filter.
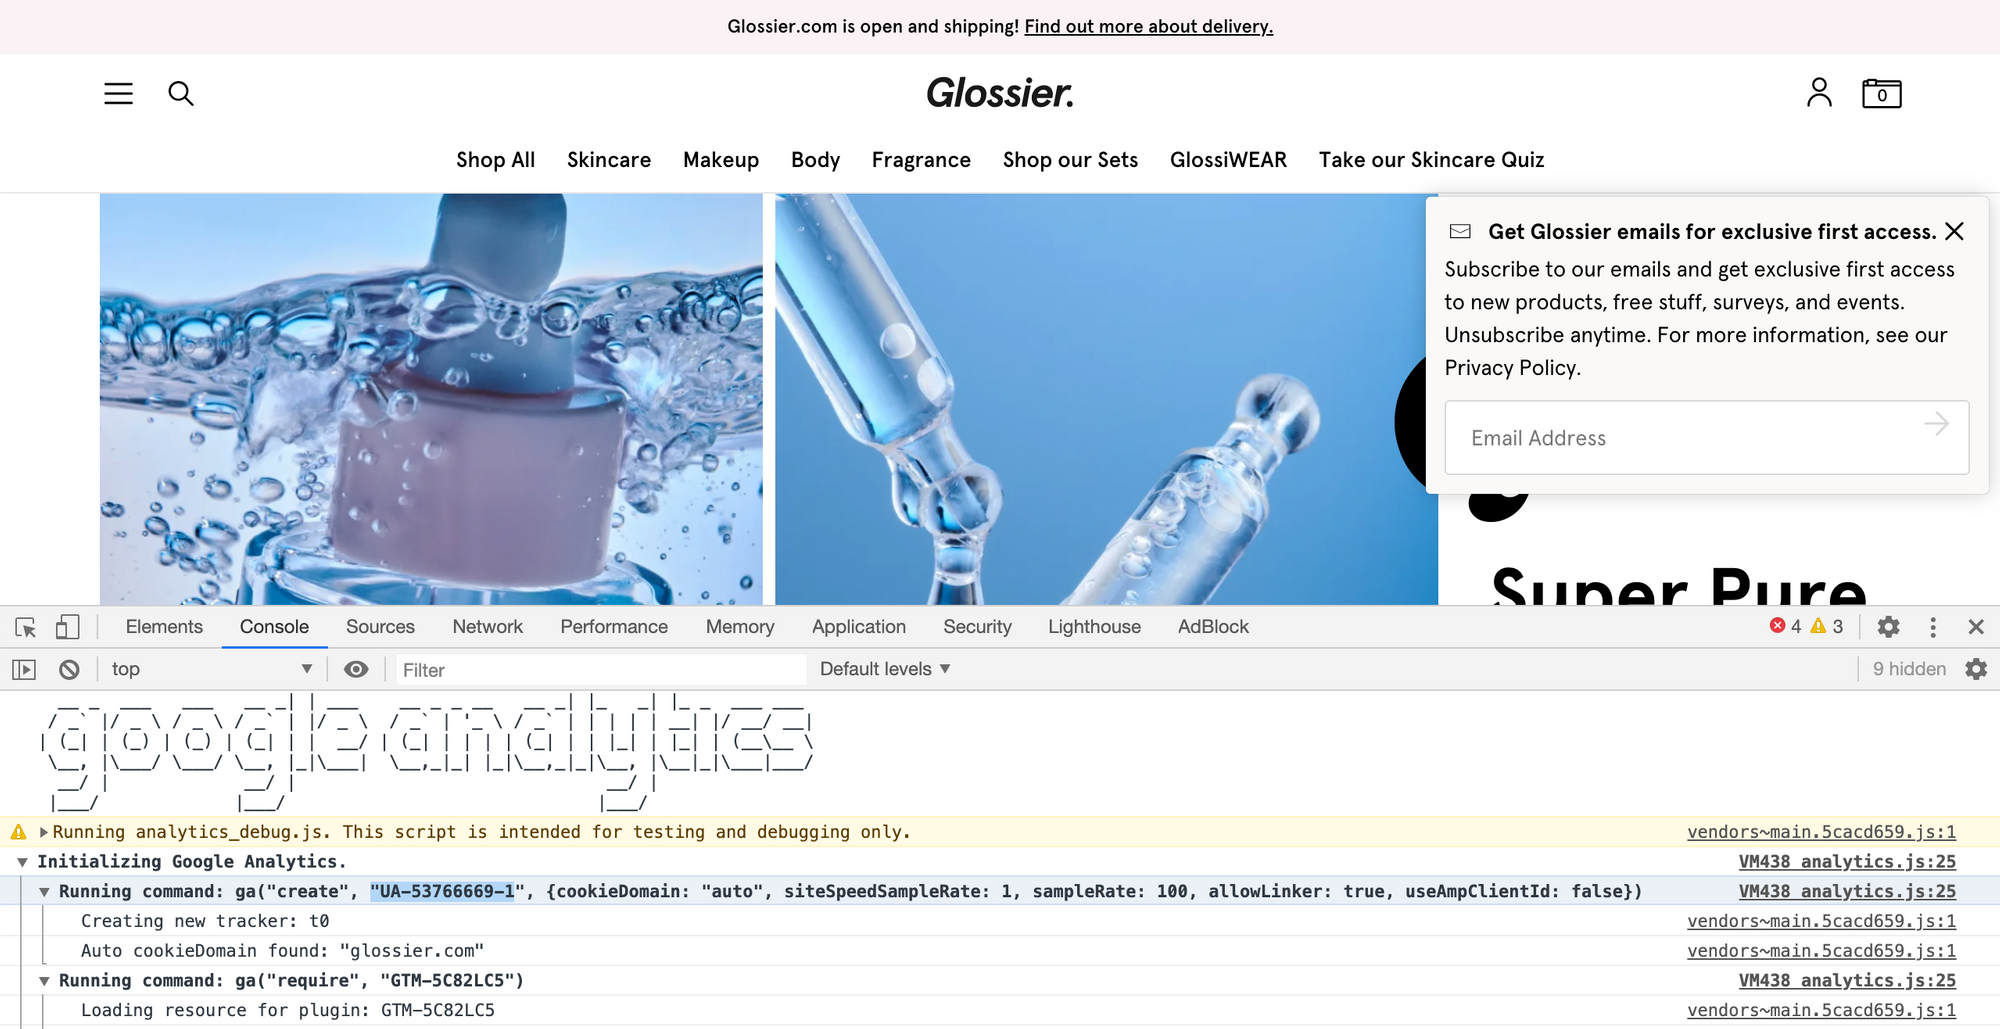
It may sound surprising, but, when collecting data, Google Analytics does not verify that the domain where a tracking snippet is installed matches the domain that was registered when the tracking snippet was created. This means that anyone with your GA ID (i.e. GA-12345678-1), can send traffic and events from their website directly into your GA dashboard and reports.
For example, we could send page view data from our website into Glossier’s Google Analytics account simply by adding their GA ID (UA-53766669-1) into the tracking snippet on our brand’s website.
Why would someone take your Google Analytics ID and send fake traffic to your brand’s GA account?
This issue often comes in the form of someone taking the HTML source code of your site, changing the content, and hosting it elsewhere. Sometimes this is someone taking shortcuts in the web development process and neglecting to remove your brand’s GA snippet as they copy your site’s code. Other times it can be truly malicious, like when a bad actor may clone your Ecommerce store to sell counterfeit goods using your brand name and assets.
Regardless of the reason for this bad data, it’s impossible to delete erroneous traffic and event data once it has reached the GA dashboard. The suggested filter below is an insurance policy to prevent a black swan event from disturbing your hard-earned GA metrics.
Setting up the anti-hijacking filter
To combat unauthorized data from being sent to our property, we can create a filter to discard any GA data that does not come from a domain (i.e. yoursite.com) that we’re expecting traffic from.
Important disclaimer: As this could cause your data to be lost if incorrectly configured, be sure to create a new Test reporting view to confirm your filter before implementing this on your Clean Data or All Web Site Data views.
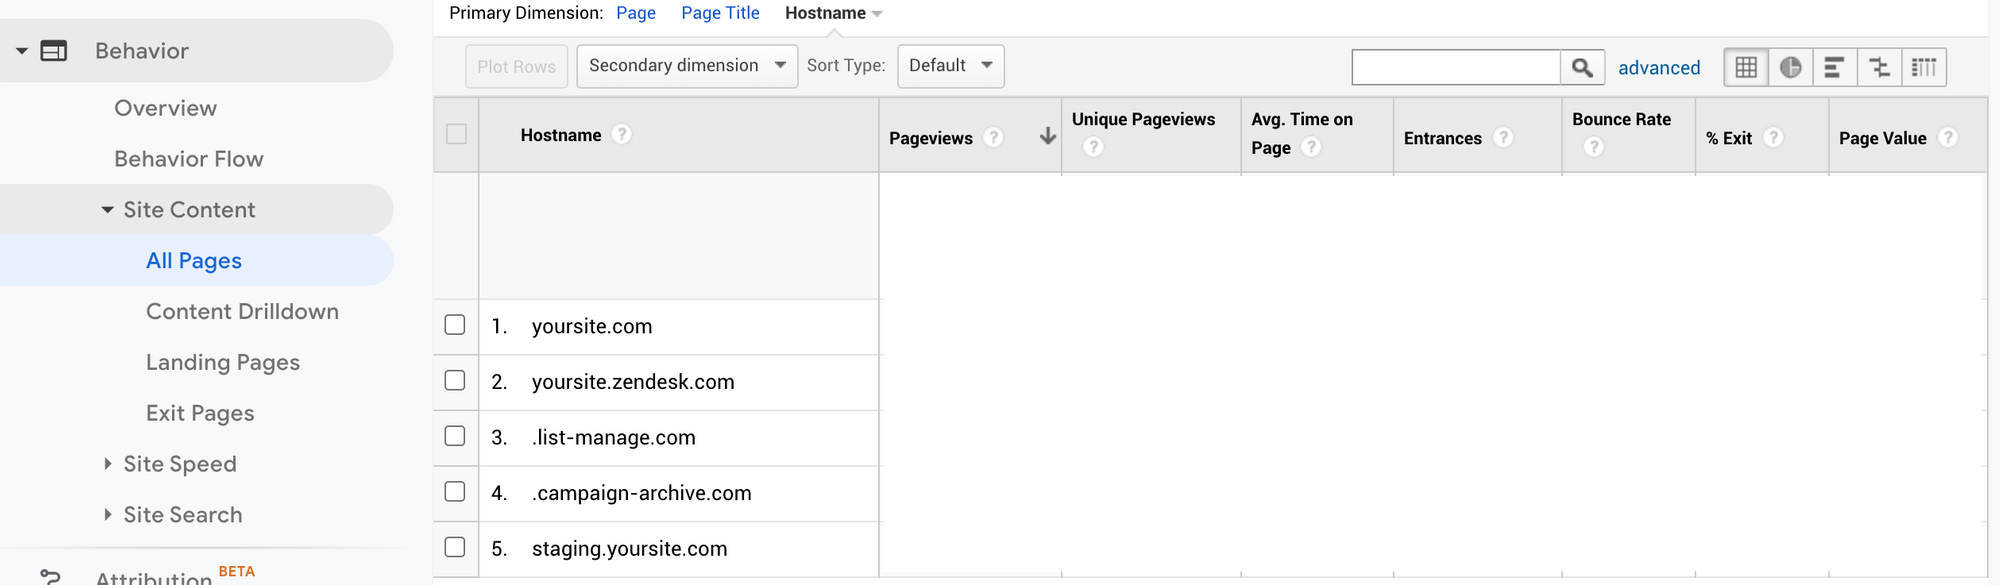
Before configuring the filter, we also need to gather a list of all existing domains that are sending legitimate traffic to our GA property. To find the list of other legitimate domains that may be sending data to your property, look at the “hostname” value, available as a primary dimension from the Behavior -> Site Content -> All Pages report. (Be sure to expand the date range as wide as possible to capture all possible 3rd party hostnames.)

You’ll need to include more than just your base domain (e.g. yoursite.com) in this list, as you may be sending traffic from external sources like a landing page platform, email platform, or marketing tool with a different domain or subdomain. Common examples of external traffic sources that you’d want to retain include Mailchimp’s .list-manage.com unsubscribe pages, Zendesk’s yoursite.zendesk.com help center, etc.
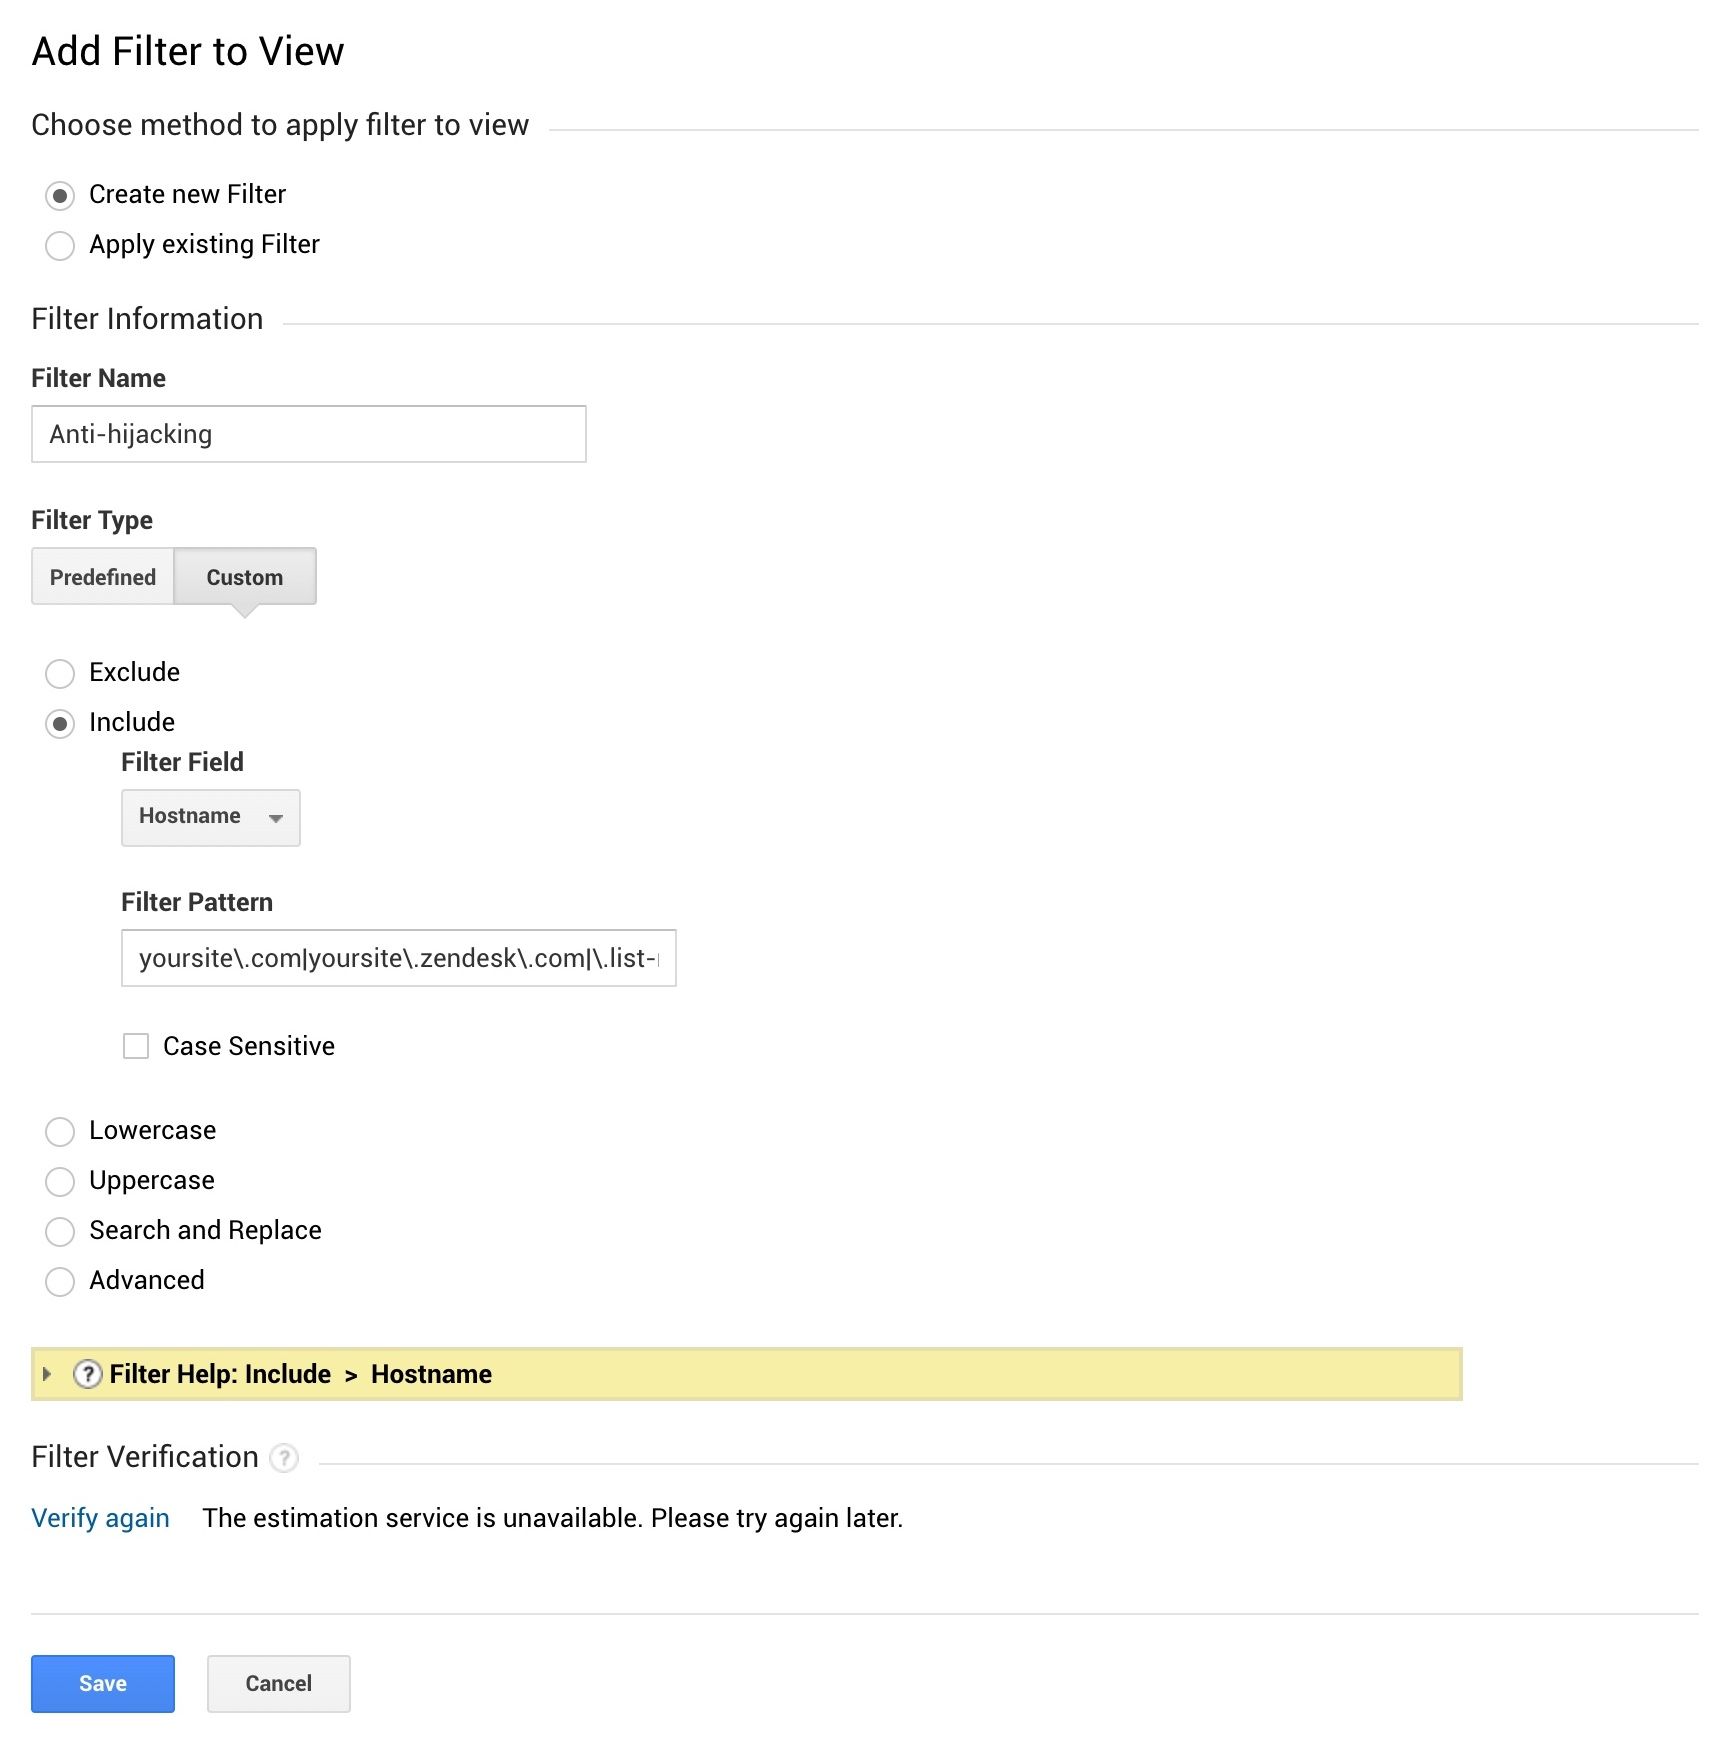
Once you have your list of domains ready, enter them in a filter named “Mitigate hijacking” with the following configuration. Because you’ll likely be including multiple domains, be sure to to enter them in the RegEx format below (e.g. everything separated by a | character and escaping . with a backslash).
Example of what we’ll paste into the “Filter Pattern” field:
| yoursite.com | yoursite.zendesk.com | .list-manage.com | .campaign-archive.com | staging/.yoursite.com |
Example completed anti-hijacking filter:
Be sure to communicate this filter change to your team
Don’t forget to share the addition of this filter with your Marketing, Product, and Engineering teams. Often times the setup process of new 3rd party Marketing or Engineering services will involve pasting in your brand’s Google Analytics tracking ID.
Now that you have this anti-hijacking filter enabled, your team team will need to update it with the domain of all new 3rd party platforms (i.e. newservice.com) before data from those services can be captured by your GA property.
6. Creating and maintaining a Query parameter exclusion list
You’re likely familiar with Query Parameters from your team’s usage of UTM parameters. These are the key/value pairs that appear at the end of URLs.
A common example of a query parameter would be fbclid, a query parameter that Facebook’s Ad platform uses to track the performance of ads.
A full example: yourbrand.com?fbclid=abc123
Query parameters like these are a useful way for Developers, Advertisers, and Marketers to pass through data to underlying analytics scripts or change content on the page without creating a battery of custom URLs.
Where query parameters become tricky within Google Analytics is when they distort page view metrics in reports like Behavior -> Site Content -> All Pages.
Without building and maintaining a query parameter exclusion list, each unique query parameter combination will be grouped together as its own line in the report. That means that if your team has been relying on the / line item in the Behavior -> Site Content -> All Pages as a method of tracking total homepage page views, you may be unintentionally excluding homepage page views that had a query parameter value.
In the below example, we see how visits to the same page parent URL are incorrectly grouped as three individual line items in the report because of differing query parameters (?lang=en-us, ?lang=en-ca, and linkId=85686530).

Adding a Query Parameter exclusion list
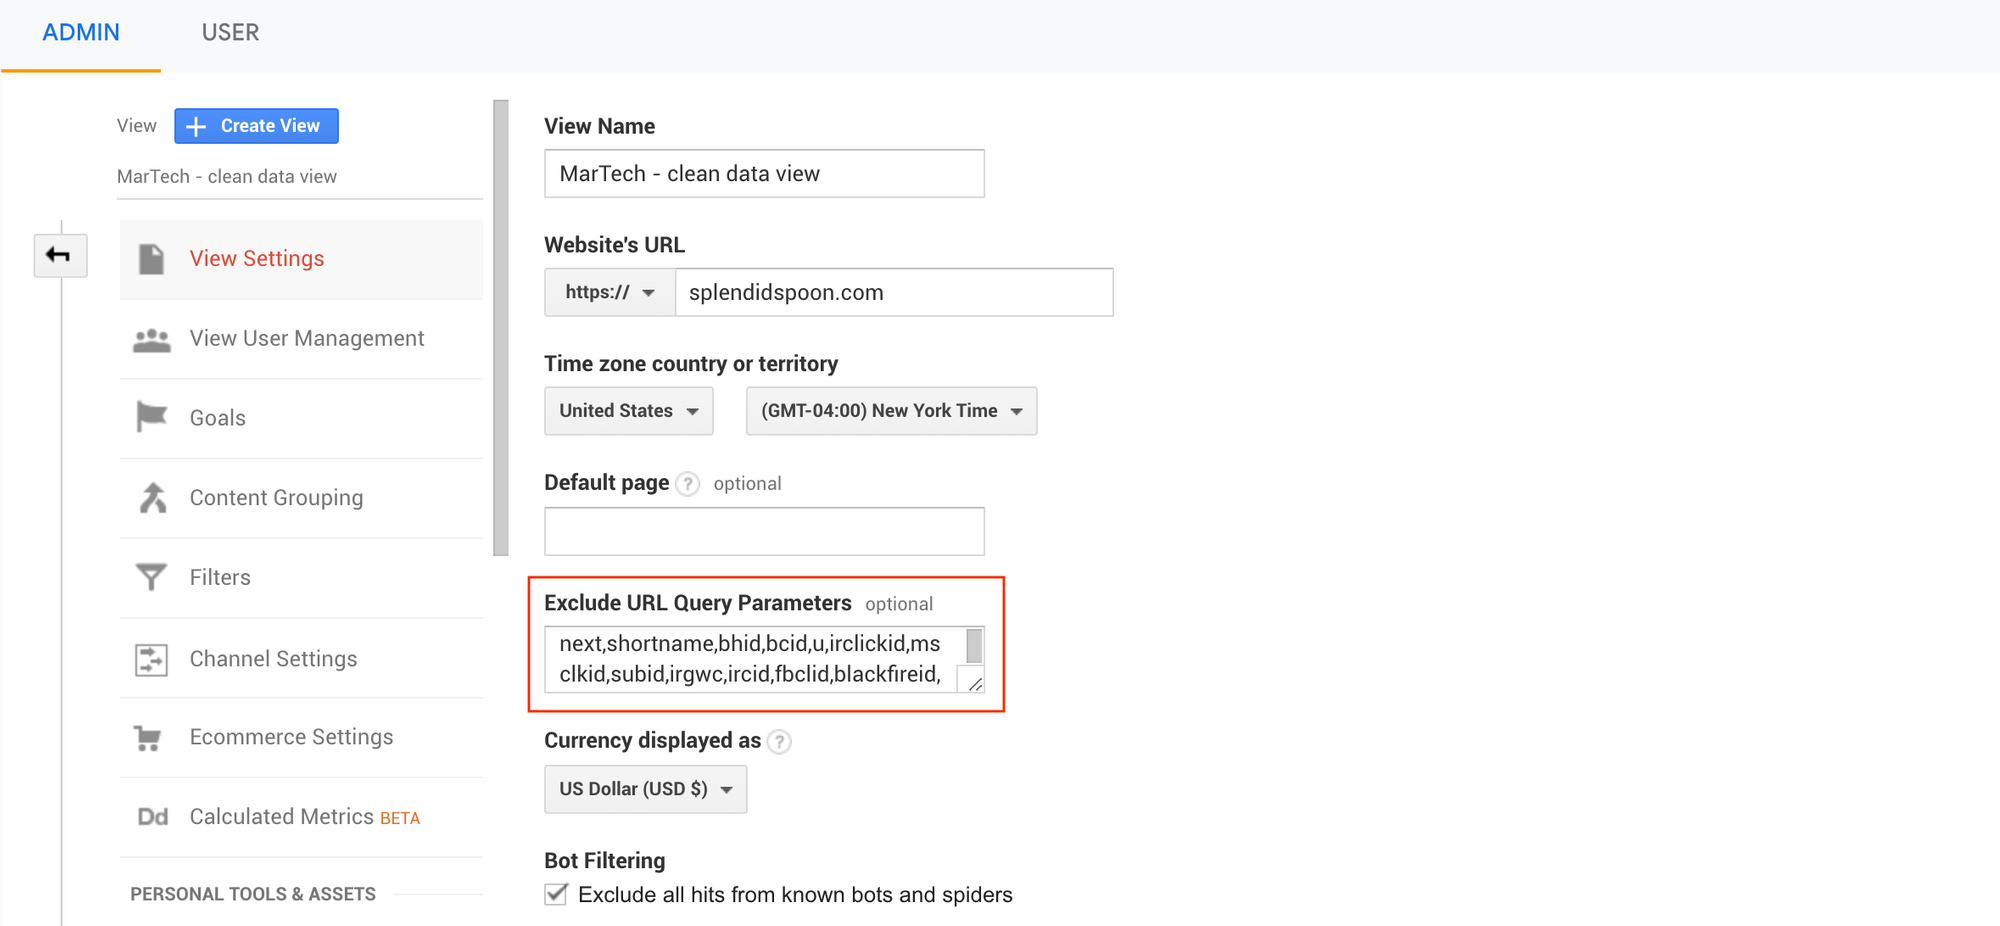
To ensure that our future page view data comes in grouped by parent page (and not by parent page + query parameter), Google Analytics provides a place to paste a comma-separated list of all query parameters that we’d like to disregard in report views.
You can find this in the GA admin panel under View -> View Settings -> Exclude URL Query Parameters.
In my experience, the easiest way to build this comma-separated list is to head to the Behavior -> Site Content -> All Pages report and:
- Add a search filter for
\?(display only page URLs with a query parameter present) - Expand the date range to include data from the past 12 months
- Expand “Show Rows” to be the top 5,000 pages
- Run a CSV export to review in Excel or Google Sheets
Note: You only need to include the “key” portion of the query parameter that you’d like to exclude in your list. AKA only the fbclid portion of a string that looks like this: &fbclid=12345abcde.
Your end result should be a list that looks like something like this, though yours will vary greatly depending on the ad partners, marketing tools, and external tracking suites that your team uses.
msclkid,subid,fbclid,campaignid,DT,BT,pi_bid_value
As you run audit and build an exclusion list, be careful not to strip out any useful internal query params that could help you cluster users in the future, like yourstore.com?plan-selected=enterprise
Finally, remember that query parameter exclusion lists are handled at the GA View level, so you’ll need to add them for your All Web Site Data and Clean Data views.
Keeping the query param exclusion list updated
After your initial audit, I’d recommend spending a few minutes each day checking for any new query parameters that you might want to add to your exclusion list. You can move this to a weekly or monthly check with a calendar invite reminder after a week or so of daily checks.
Note: It’s possible to discard all query parameters with a GA view filter, but I don’t recommend that most teams take such a drastic approach until they’re more familiar with any internal query parameters that might contain data not available elsewhere in the URL path (i.e. yourstore.com?plan-selected=enterprise).
7. Configure a Referral Exclusion list
Configuring your GA Referral Exclusion list is a quick task that can help clean up and/or prevent duplicate sessions from skewing the data available in your Acquisition -> All Traffic -> Referrals and Acquisition -> All Traffic -> Source / Medium reports.
This is an especially important step if your team is using a platform like Shopify or has any integrations with external payment gateways like PayPal, Affirm, or AfterPay.
If a Referral Exclusion list is not configured to exclude landing page builder, help center, and external payment gateway domains, you’ll lose the original traffic source for those users / sessions and be left with unhelpful self-referrals + duplicate sessions.
Google’s documentation on the Referral Exclusion list provides a great example of why it’s so important to configure this list when dealing with cross-domain tracking:
Because each referral triggers a new session, excluding referrals (or not excluding referrals) affects how sessions are calculated in your account. The same interaction can be counted as either one or two sessions, based on how you treat referrals.
For example, a user on my-site.com goes to your-site.com, and then returns to my-site.com. If you do not exclude your-site.com as a referring domain, two sessions are counted, one for each arrival at my-site.com. If, however, you exclude referrals from your-site.com, the second arrival to my-site.com does not trigger a new session, and only one session is counted.
Implementing a Referral Exclusion list
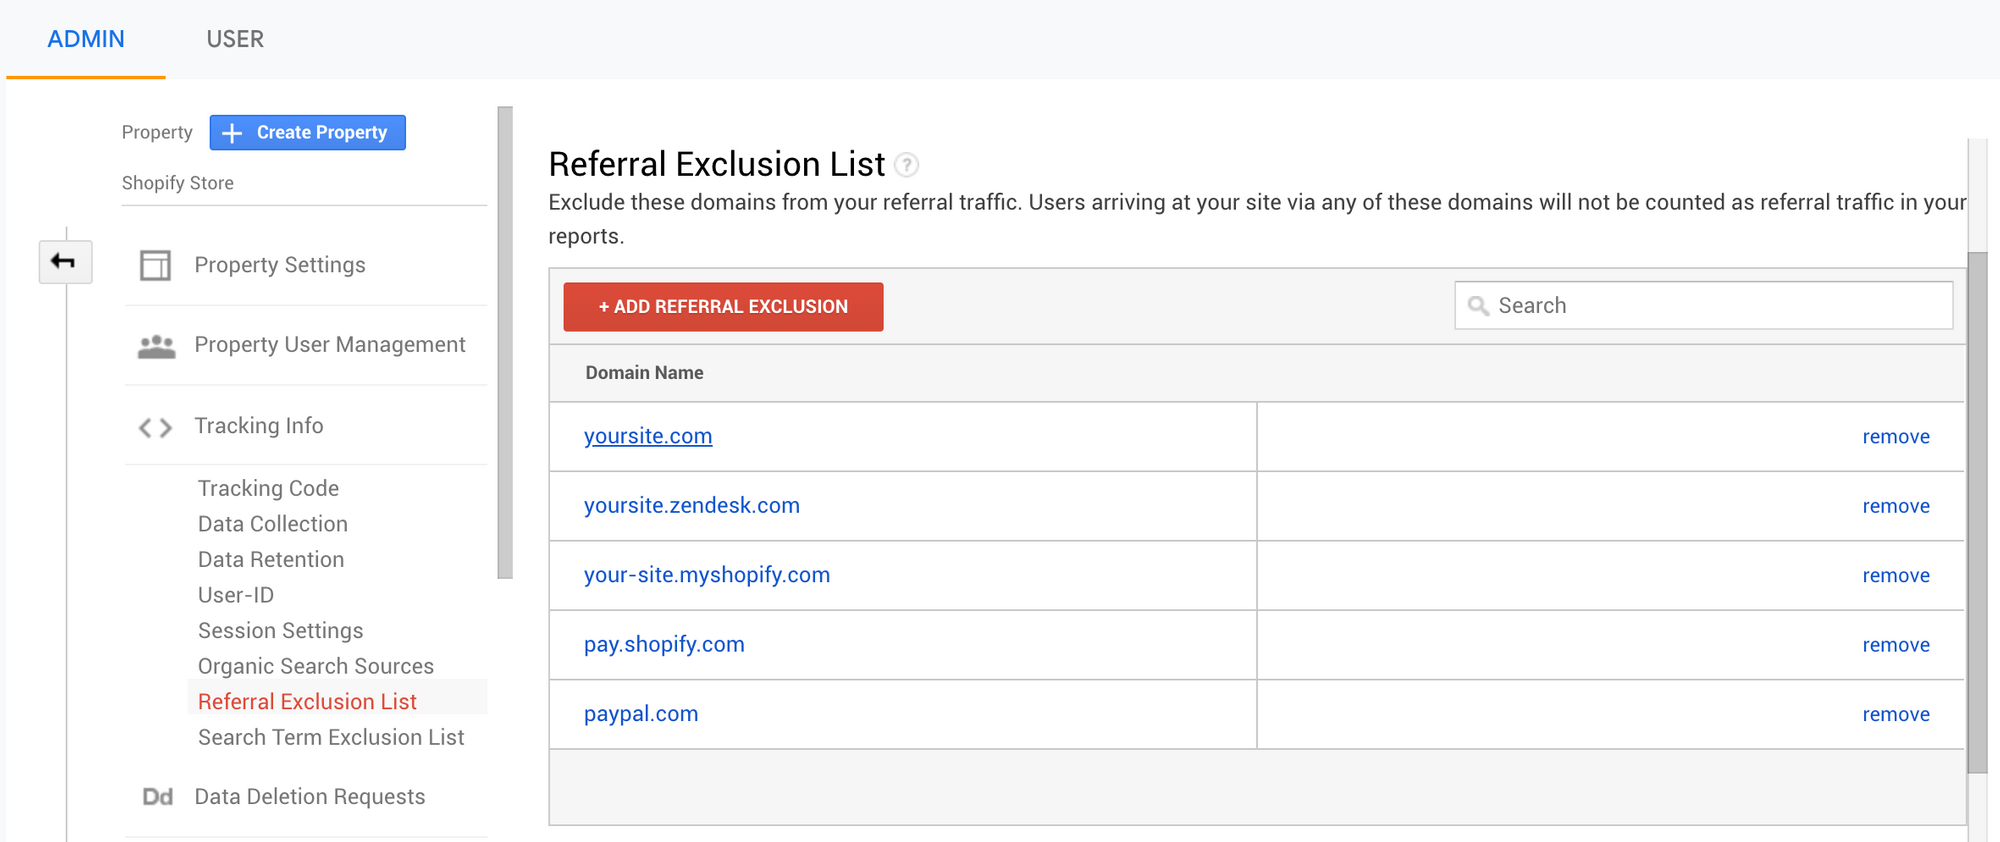
To update your Referral Exclusions list, head to the GA admin panel and navigate to Tracking Info -> Referral Exclusion List.
Here’s what an example Referral Exclusion list might look like for a brand using both Shopify and Zendesk:
To audit and make sure you’ve captured the full list of domains to add to your Referral Exclusion list, head to Acquisition -> All Traffic -> Source/Medium and sort the Ecommerce Conversion Rate column.
If you spot any payment-related (afterpay.com, pay.google.com, etc.) or subdomain (try.yoursite.com) line items here with spectacular conversion rates (>25%) and significant volume (>10 purchases, depending on sales volume), it’s likely that the domain should be added to the Referral Exclusion list.
Unlike the previous few changes we made with filters, this change is made at the GA Property level, meaning that we only need to make the change in one place for it to apply to all GA reporting views.
8. Verify Google Search Console <> GA linking
There’s a common misconception that Google Analytics no longer displays information about organic Google.com searches.
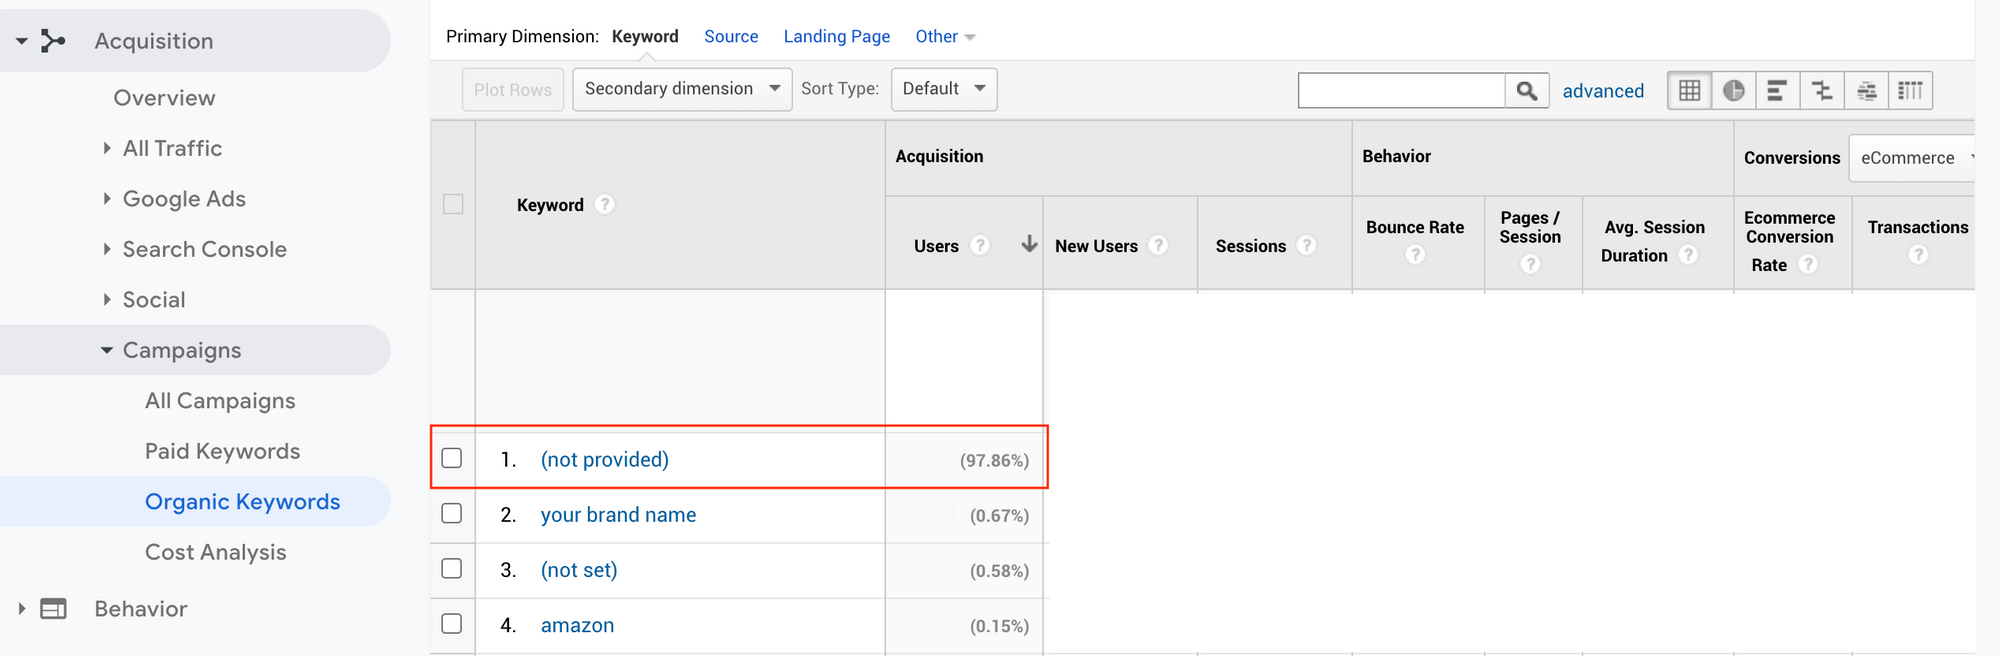
This misconception is driven by Marketers who arrive at the Acquisition -> Campaigns -> Organic Keyword report and see a harrowing “(not provided)” value representing 98.xx% of report traffic.
Thankfully, Google Search Console provides an easy way to surface this obfuscated organic search data to our Google Analytics property. And, unlike most things we’ve covered in this guide, any data that already exists in your brand’s Google Search Console account will backfill to all our existing GA views.
Note: If you don’t already have a Google Search Console account with a verified web property, create one before continuing.
Similar to the Referral Exclusion list, you’ll link your Google Analytics account to your Google Search Console account at the GA Property level.
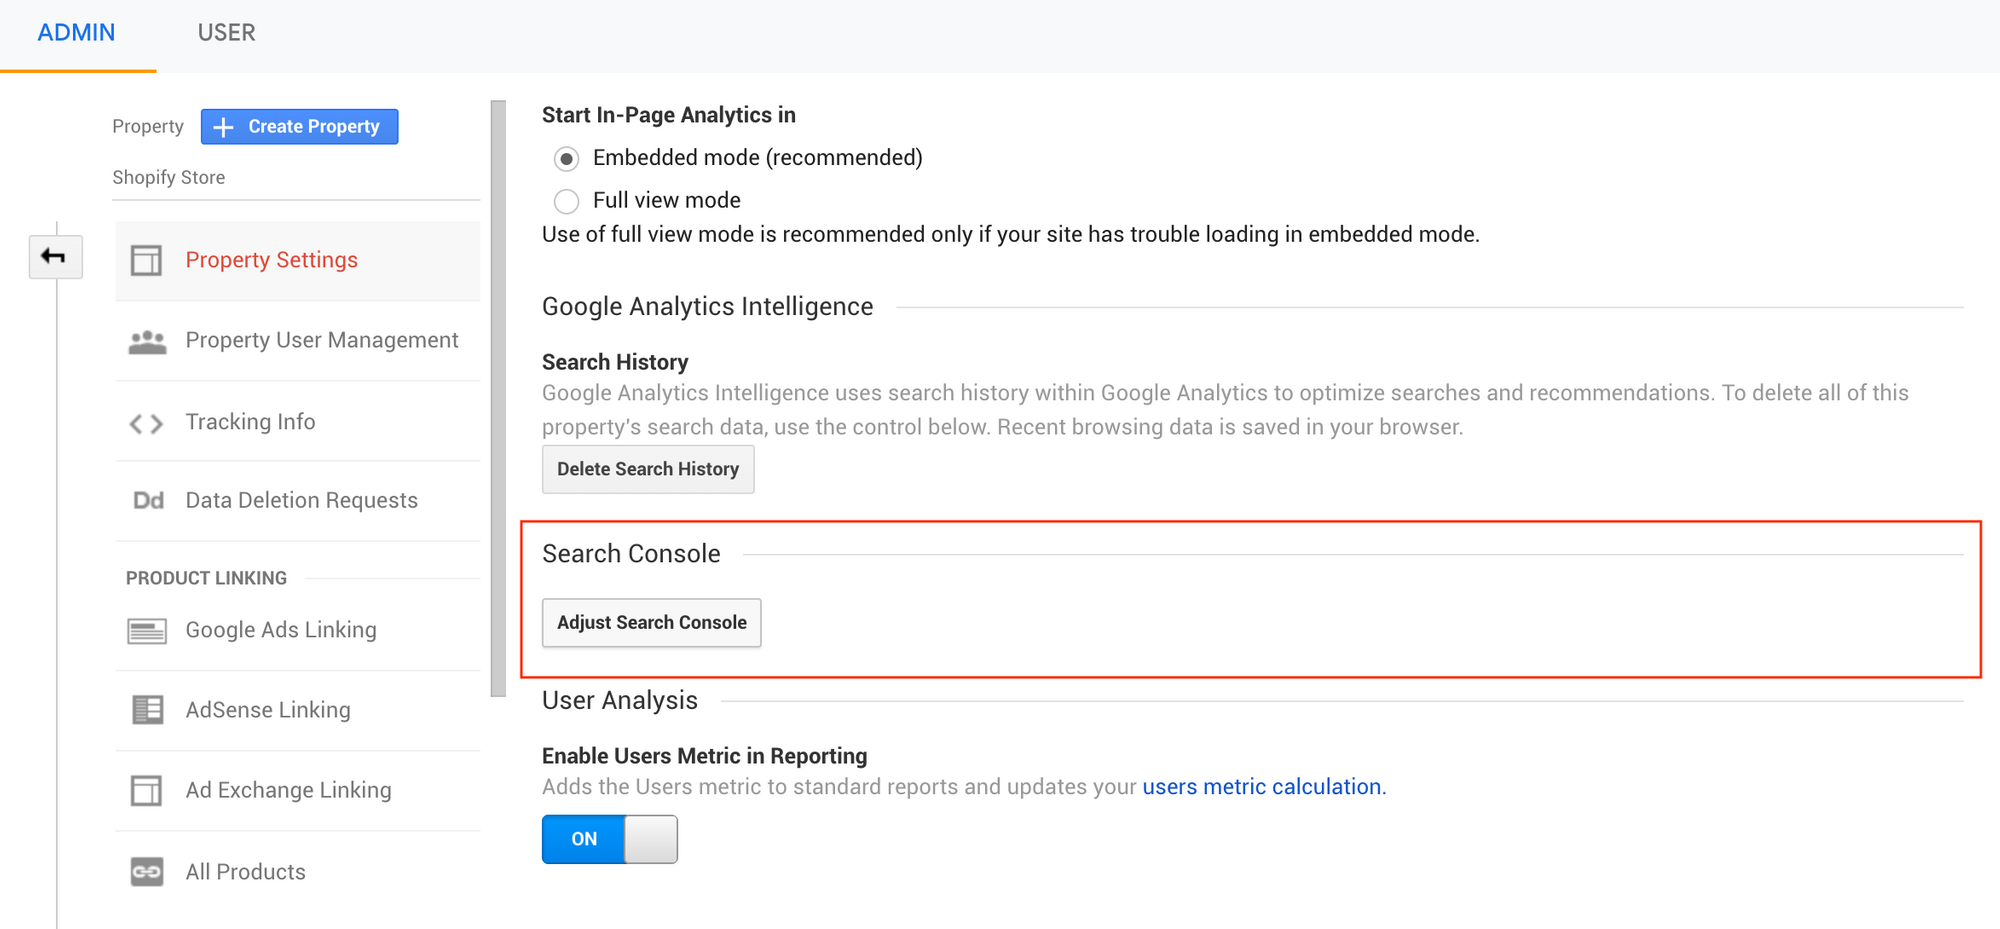
To do this, navigate to the GA admin panel and look for Property -> Property Settings -> Adjust Search Console.
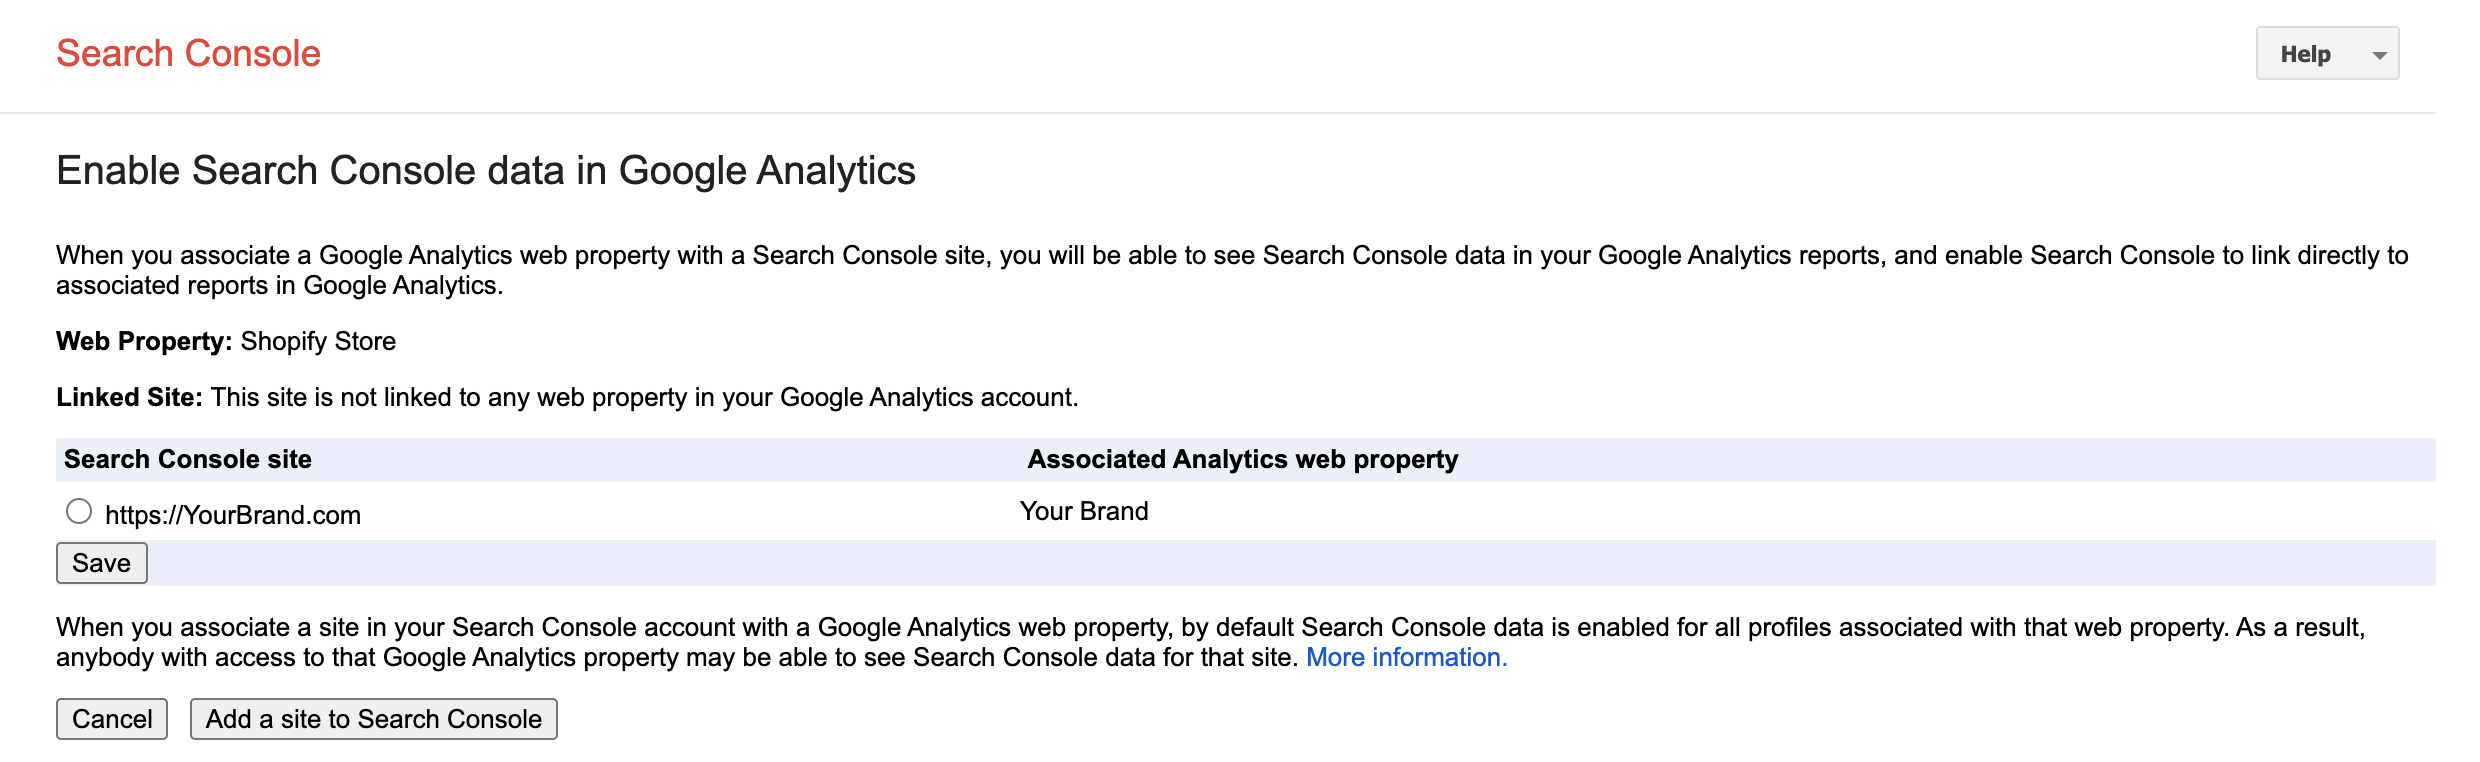
Next, click “Add” to be taken to a list of available GSC verified websites. Select the verified website that matches your GA view (i.e. select “yoursite.com” in GSC if your GA property is setup to track traffic for “yoursite.com”) and you’re all set!
Once your accounts are linked, you’ll be able to access detailed organic search data in your GA dashboard via the Acquisition -> Search Console reports.

9. Using secondary dimensions and advanced filtering to mash up data
Taking a break from being so tactical, let’s explore one of the most helpful GA tools that’s hidden just below the surface - Secondary Dimensions.
If you’ve ever found yourself looking at a GA report wishing that you could “mash up” data from another view (i.e. wanting to see Source/Medium and Campaign values all in one place), Secondary Dimensions are the answer.
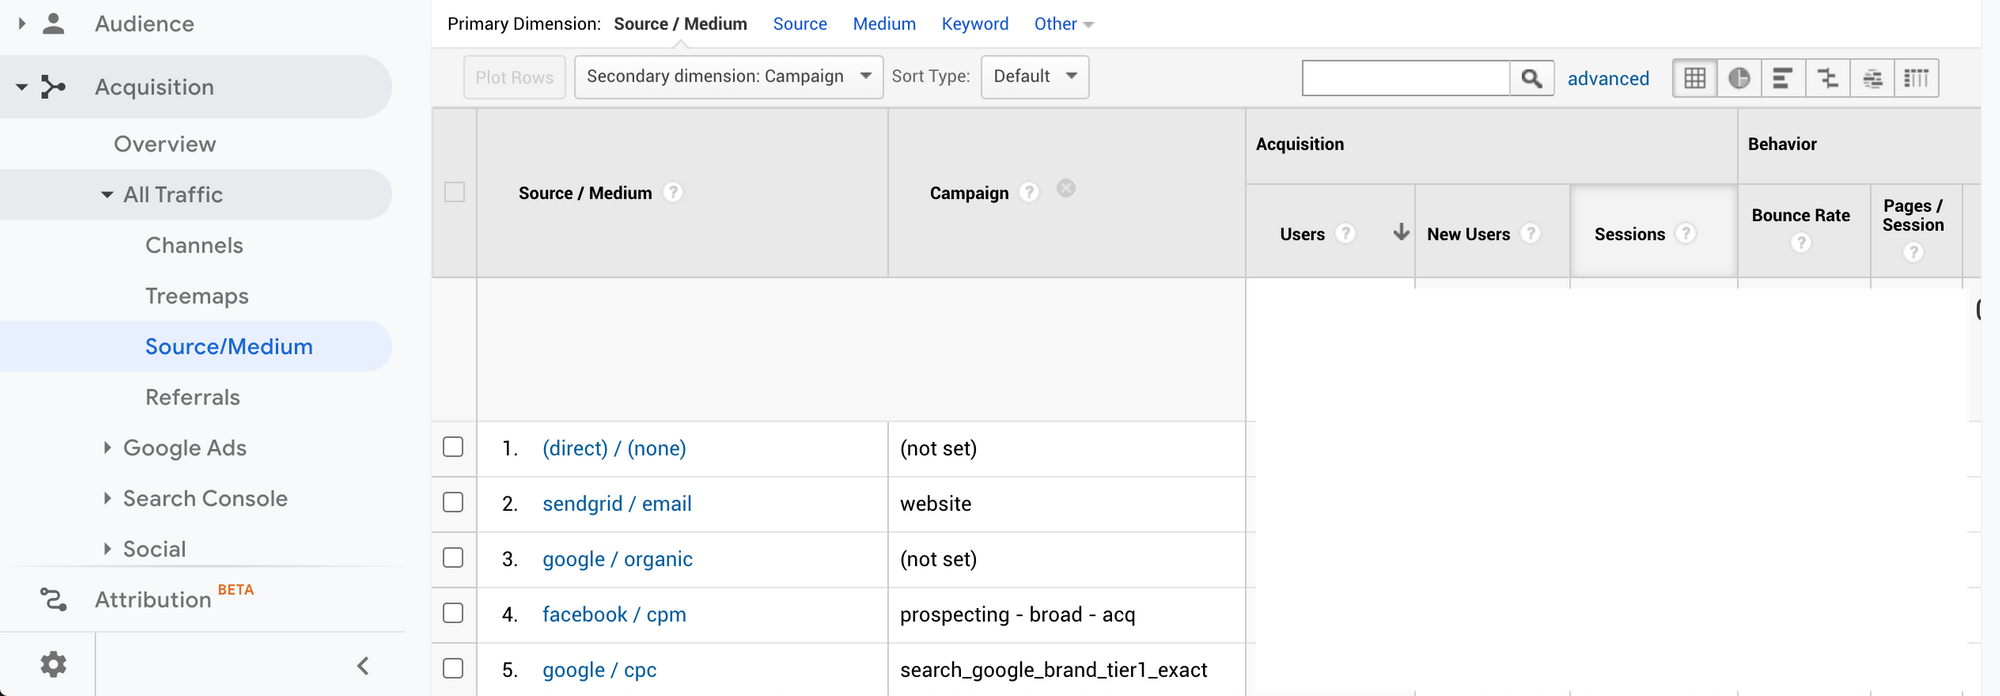
From almost any report in GA, select an item from the Secondary Dimension dropdown list and you’ll see that data displayed next to the default view.
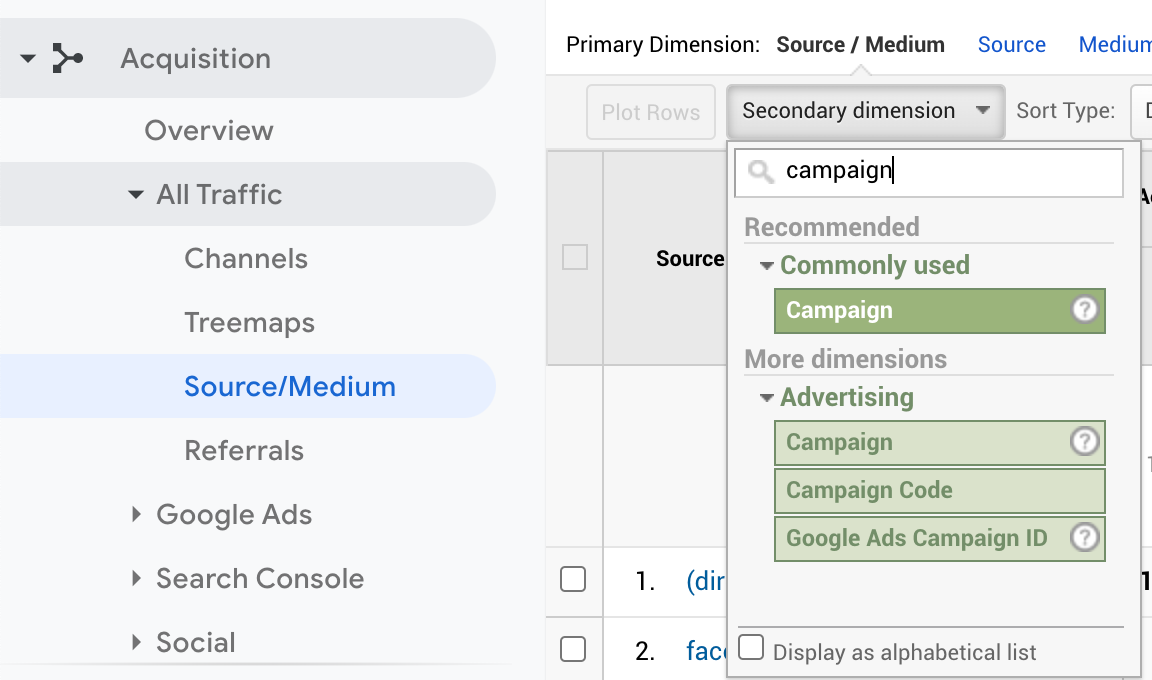
The change above will turn the Source/Medium report into a full-featured report listing Source/Medium + Campaign together in one place.
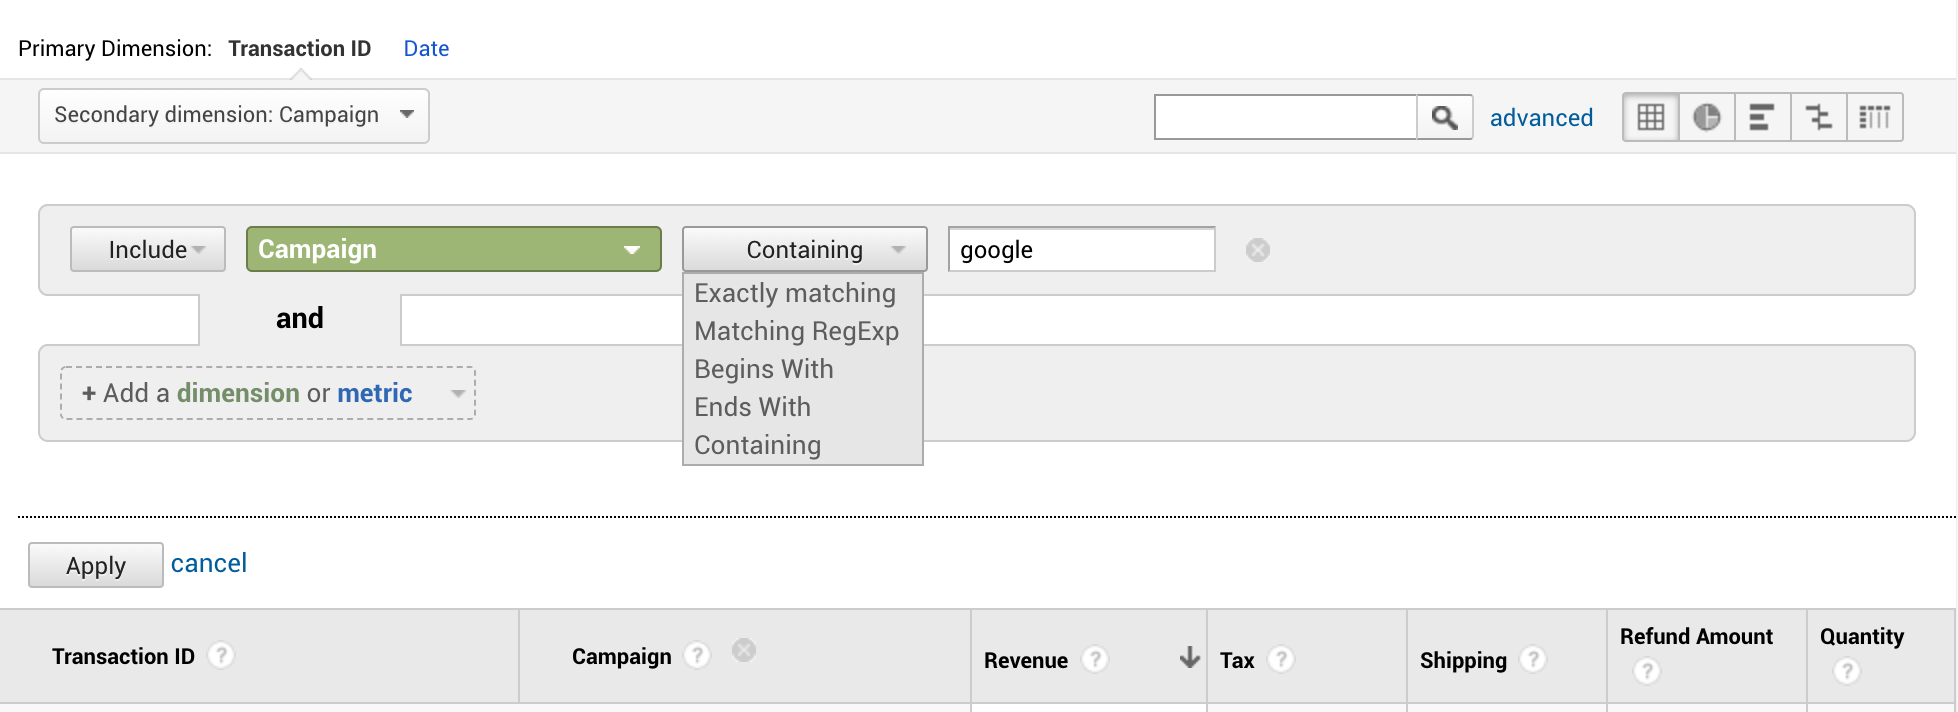
Another longed-for report combination in the Conversions -> Ecommerce -> Sales Performance report is the ability to see which campaign or referring URL a specific order came through.
With secondary dimensions in GA, it’s as simple as adding a Secondary Dimension of Campaign to see the specific campaign value for each Transaction ID:

Now that we’re familiar with secondary dimensions, let’s take a quick look at GA’s Advanced Filtering to see how they can help us more easily filter reports.

With the standard report search bar, we’re only able to search for a single value on the report’s primary dimension. In the example above, that means that we could not create a query of:
“Show me all Transactions that came from a campaign with
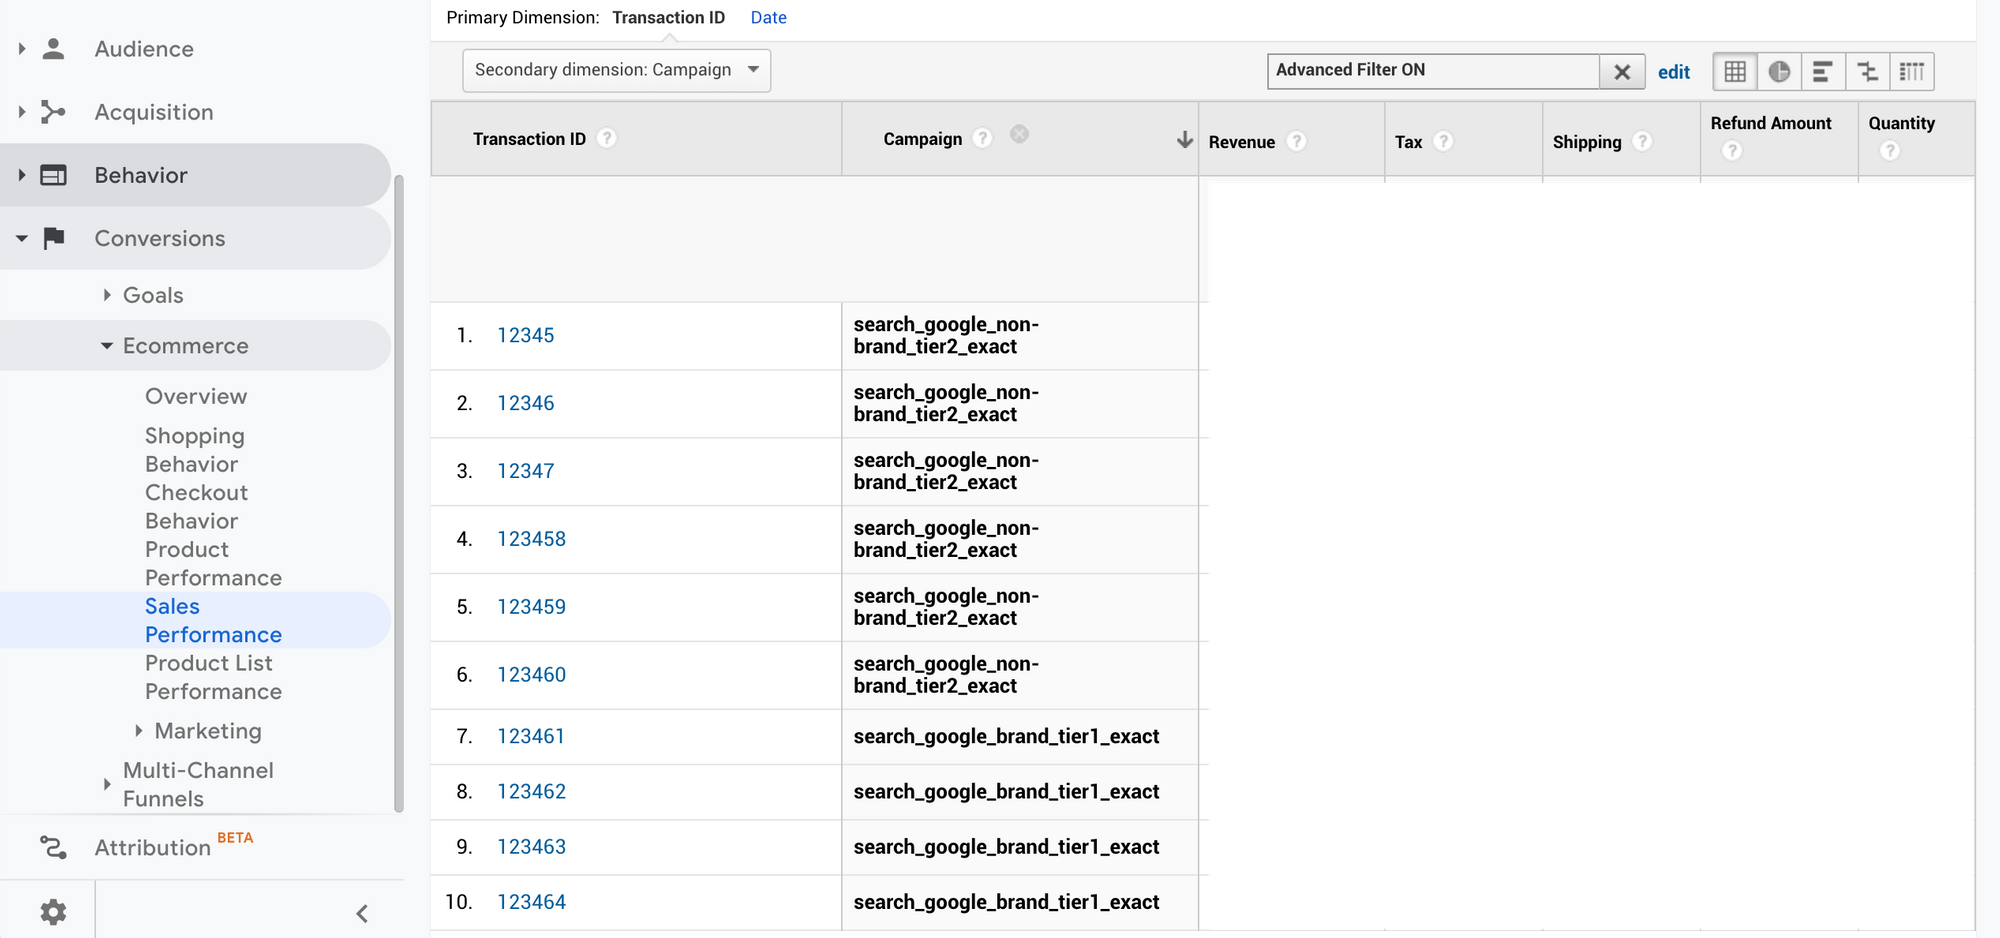
With GA Advanced Filtering, we’re able to quickly create a query (using RegEx and exact matching if required) without leaving our report. Here’s an example:
With this example Advanced Filtering enabled, our report now displays a full list of orders matching our query:
10. An additional resource for those using Shopify or Shopify Plus
If you’re working on a store using Shopify or Shopify Plus, don’t miss out on this excellent guide to Shopify <> Google Analytics written by Joshua Uebergang for Digital Darts.
Joshua’s guide provides an excellent next step if you’ve completed all the setup steps in this article and are eager to further shore up your data connection between GA and your Shopify store.